Developer Guide
Table of Contents
- Acknowledgements
- Setting up, getting started
- Design
- Implementation of features
- Documentation, logging, testing, configuration, dev-ops
- Appendix: Requirements
- Appendix: Instructions for manual testing
- Appendix: Planned Enhancement
Acknowledgements
- This project is based on the AddressBook-Level3 project created by the SE-EDU initiative.
- Code and documentations reused and adapted from AB3 project created by the SE-EDU initiative.
Setting up, getting started
Refer to the guide Setting up and getting started.
Design
.puml files used to create diagrams in this document can be found in the diagrams folder. Refer to the PlantUML Tutorial at se-edu/guides to learn how to create and edit diagrams.
Architecture

The Architecture Diagram given above explains the high-level design of the App.
Given below is a quick overview of main components and how they interact with each other.
Main components of the architecture
Main has two classes called Main and MainApp. It is responsible for,
- At app launch: Initializes the components in the correct sequence, and connects them up with each other.
- At shut down: Shuts down the components and invokes cleanup methods where necessary.
Commons represents a collection of classes used by multiple other components.
The rest of the App consists of four components.
-
UI: The UI of the App. -
Logic: The command executor. -
Model: Holds the data of the App in memory. -
Storage: Reads data from, and writes data to, the hard disk.
How the architecture components interact with each other
The Sequence Diagram below shows how the components interact with each other for the scenario where the user issues the command delete 1.

Each of the four main components (also shown in the diagram above),
- defines its API in an
interfacewith the same name as the Component. - implements its functionality using a concrete
{Component Name}Managerclass (which follows the corresponding APIinterfacementioned in the previous point.
For example, the Logic component defines its API in the Logic.java interface and implements its functionality using the LogicManager.java class which follows the Logic interface. Other components interact with a given component through its interface rather than the concrete class (reason: to prevent outside component’s being coupled to the implementation of a component), as illustrated in the (partial) class diagram below.

The sections below give more details of each component.
UI component
The API of this component is specified in Ui.java

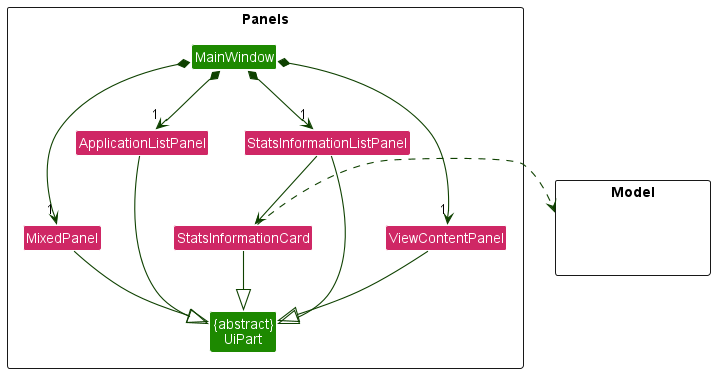
The reference of the panels node is as shown below:
The detailed components of MixedPanel and ApplicationListPanel are as shown below:
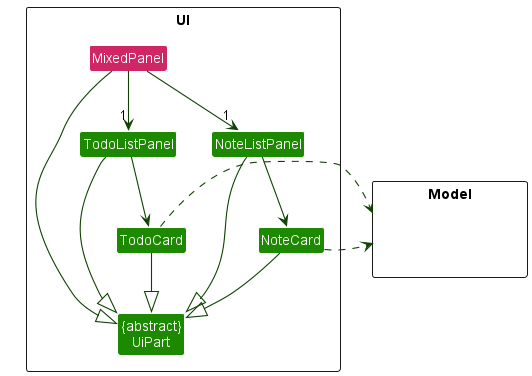
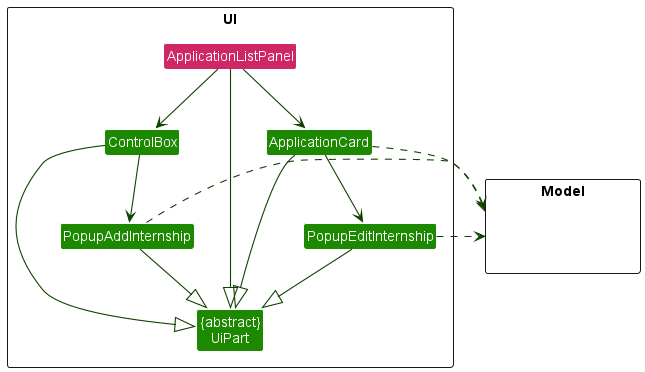
The UI consists of a MainWindow that is made up of parts e.g.CommandBox, MixedPanel, NoteListPanel, TodoListPanel etc. All these, including the MainWindow, inherit from the abstract UiPart class which captures the commonalities between classes that represent parts of the visible GUI.
The UI component uses the JavaFx UI framework. The layout of these UI parts are defined in matching .fxml files that are in the src/main/resources/view folder. For example, the layout of the MainWindow is specified in MainWindow.fxml
The UI component,
- executes user commands using the
Logiccomponent. - listens for changes to
Modeldata so that the UI can be updated with the modified data. - keeps a reference to the
Logiccomponent, because theUIrelies on theLogicto execute commands. - depends on some classes in the
Modelcomponent, as it displaysInternshipApplicationobject residing in theModel. - listens on each other in the
Uicomponent, asCommandBoxcalls functions inMainWindowtoexecute()Logic. - keeps a reference to other
Uicomponent, asMainWindowkeeps references ofMixedPanel,NoteListPanel,ApplicationListPanelandTodoListPanelto implement the switching between each panel.
Logic component
API : Logic.java
Here’s a (partial) class diagram of the Logic component:

How the Logic component works:
- When
Logicis called upon to execute a command, it uses theInternEaseParserclass to parse the user command. - This results in a
Commandobject (more precisely, an object of one of its subclasses e.g.,AddCommand) which is executed by theLogicManager. - The command can communicate with the
Modelwhen it is executed (e.g. to add an internship application). - The result of the command execution is encapsulated as a
CommandResultobject which is returned back fromLogic.
The Sequence Diagram below illustrates the interactions within the Logic component for the execute("delete 1") API call.

DeleteCommandParser should end at the destroy marker (X) but due to a limitation of PlantUML, the lifeline reaches the end of diagram.
Here are the other classes in Logic (omitted from the class diagram above) that are used for parsing a user command:

How the parsing works:
- When called upon to parse a user command, the
InternEaseParserclass creates anXYZCommandParser(XYZis a placeholder for the specific command name e.g.,AddCommandParser) which uses the other classes shown above to parse the user command and create aXYZCommandobject (e.g.,AddCommand) which theInternEaseParserreturns back as aCommandobject. - All
XYZCommandParserclasses (e.g.,AddCommandParser,DeleteCommandParser, …) inherit from theParserinterface so that they can be treated similarly where possible e.g, during testing.
Model component
API : Model.java

The Model component,
- stores the internship applications data i.e., all
InternshipApplicationobjects (which are contained in aUniqueApplicationListobject). - stores the currently ‘selected’
Applicationobjects (e.g., results of a search query) as a separate filtered list which is exposed to outsiders as an unmodifiableObservableList<InternshipApplication>that can be ‘observed’ e.g. the UI can be bound to this list so that the UI automatically updates when the data in the list change. - stores a
UserPrefobject that represents the user’s preferences. This is exposed to the outside as aReadOnlyUserPrefobjects. - does not depend on any of the other three components (as the
Modelrepresents data entities of the domain, they should make sense on their own without depending on other components)
Storage component
API : Storage.java

The Storage component,
- can save both address book data and user preference data in json format, and read them back into corresponding objects.
- inherits from both
AddressBookStorageandUserPrefStorage, which means it can be treated as either one (if only the functionality of only one is needed). - depends on some classes in the
Modelcomponent (because theStoragecomponent’s job is to save/retrieve objects that belong to theModel)
Common classes
Classes used by multiple components are in the seedu.addressbook.commons package.
Implementation
This section describes some noteworthy details on how certain features are implemented.
Add feature
How add feature is implemented
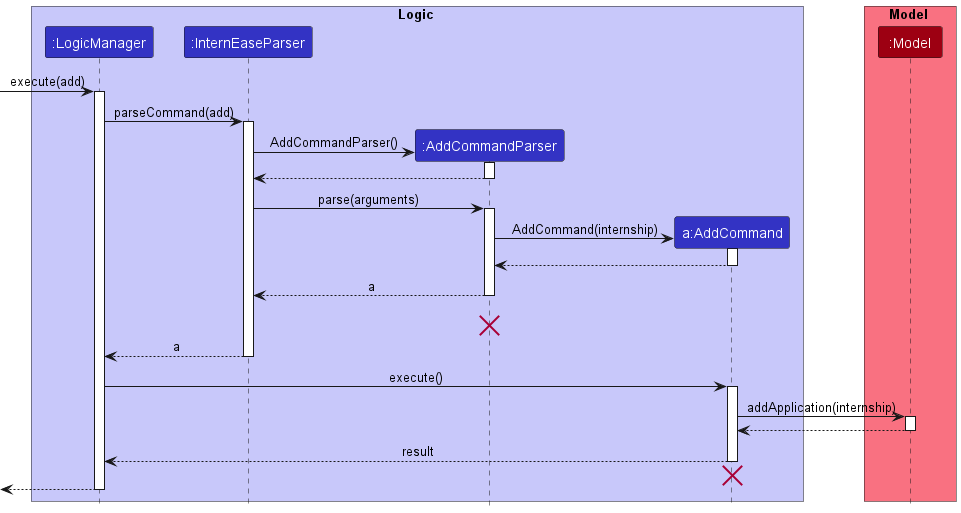
The add command allows users to add an internship application to the tracker. The add mechanism is facilitated by AddCommand class. It extends Commandbut overrides the Command#execute to add an internship application to the tracker.
The sequence diagram below shows how the AddCommand object is created:
Step 1. Parsing
The AddCommandParser checks that the user input is in the expected format, if not an exception will be thrown.
Step 2. Execution
The AddCommand#execute calls Model#addApplication, causing an update to the internship list.
Step 3. Result
The updated model is then saved. A CommandResult object with a message containing the execution result of the command is created and returned to MainWindow#execute.
Edit feature
How edit feature is implemented
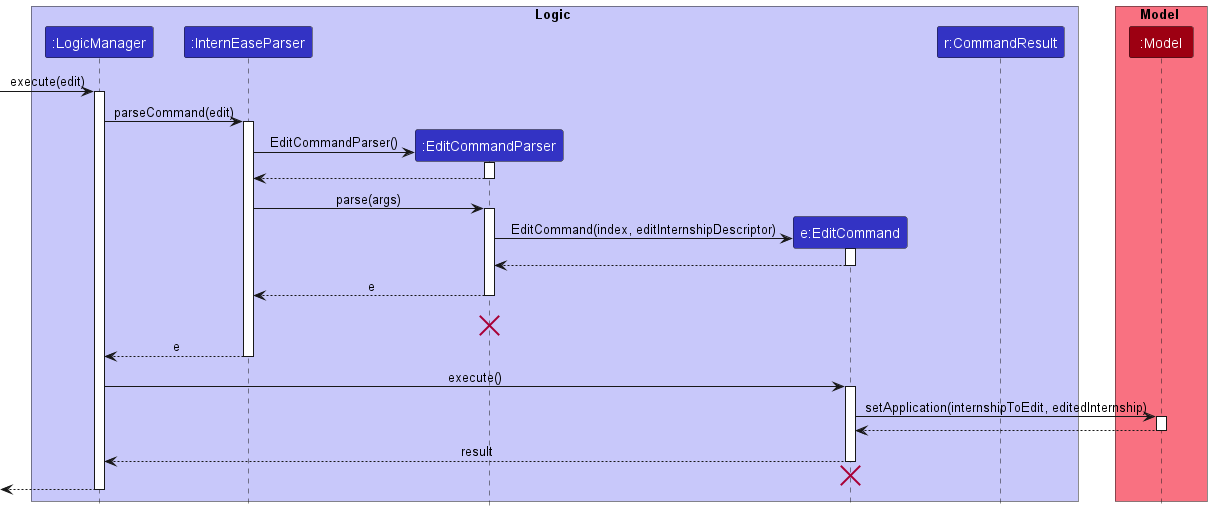
The edit command allows users to edit an internship application of the tracker. The edit mechanism is facilitated by EditCommand class. It extends Commandbut overrides the Command#execute to edit an internship application of the tracker.
The sequence diagram below shows how the EditCommand object is created:
Step 1. Parsing
The EditCommandParser checks that the user input is in the expected format, if not an exception will be thrown.
Step 2. Execution
The EditCommand#execute calls Model#setApplication, causing an update to the internship list.
Step 3. Result
The updated model is then saved. A CommandResult object with a message containing the execution result of the command is created and returned to MainWindow#execute.
Add contact feature
How is the feature implemented
The add_contact command allows users to add the contact of a company to an internship application. The implementation of the add_contact command is facilitated by the AddContactCommand class which is derived from the Command superclass, and overrides the Command#execute method.
The parsing process meanwhile involves the InternEaseParser#parseCommand, ContactParser#parseContactCommand and the AddContactCommandParser#parse methods.
The activity diagram below shows the workflow of the add_contact command during its execution.
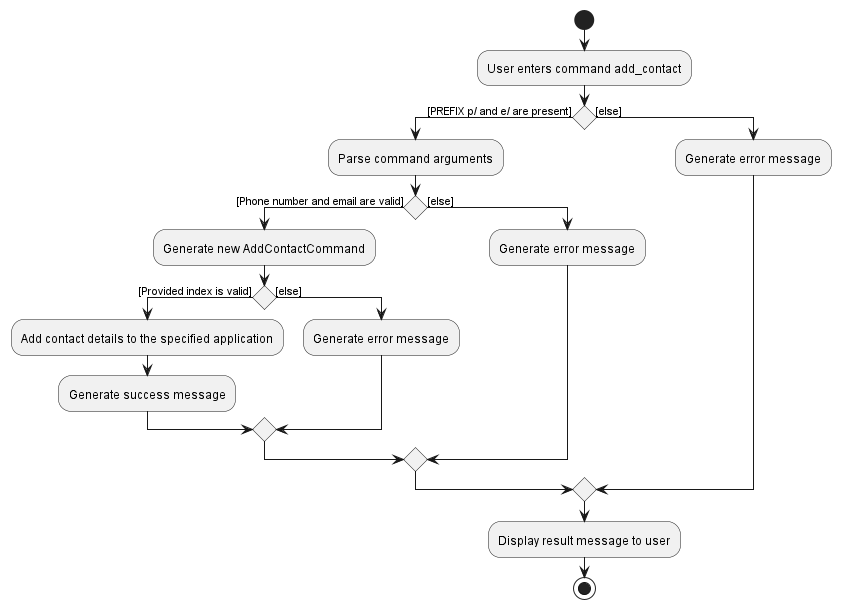
The constructor of the class AddContactCommand requires 2 arguments, a valid positive Integer index and a Contact object, both of which are obtained after the parsing process mentioned above.
The relevant operations from the Model interface are Model#getSortedFilteredInternshipList and Model#setApplication.
A sequence diagram is shown here to illustrate the execution process of the add_contact command.
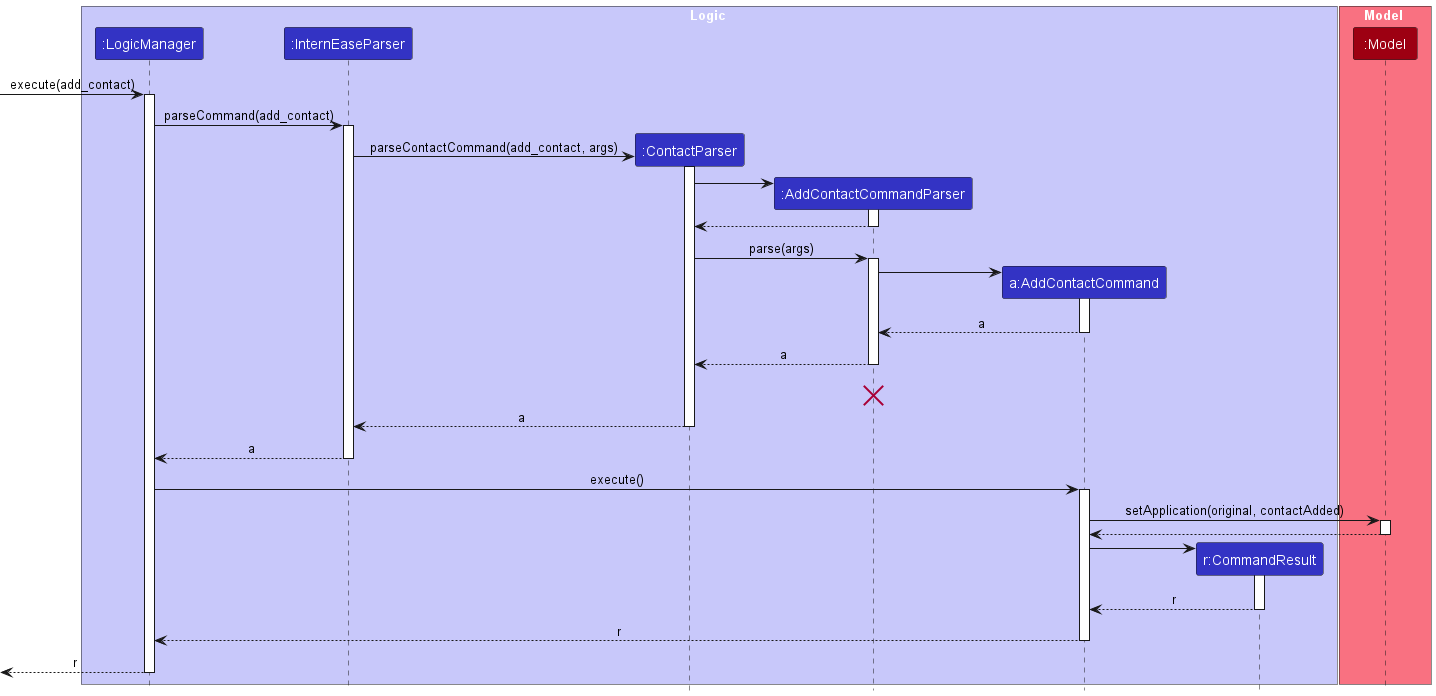
Given below is an explanation on the add_contact command’s behaviours.
Step 1. Parsing
The CommandBox#execute method is invoked when the user’s input in CommandBox is parsed, which results in the command word being parsed in the method InternEaseParser#parseCommand and subsequently the method ContactParser#parseContactCommand.
The method AddContactCommandParser#parse is invoked only if the command word matches AddContactCommand.COMMAND_WORD.
Step 2. Execution
The AddContactCommand#execute method is invoked and calls are made to the model instance. The last shown list of internships are obtained by calling the method Model#getSortedFilteredInternshipList.
The internship application where the contact is to be added is then obtained by calling the UniqueApplicationList#get method with the specified index. As the InternshipApplication object is
immutable, a new InternshipApplication object is created with the contact details. The Model#setApplication method is then invoked to update the specified application in the list.
Step 3. Result
The updated model is then saved. A CommandResult object with a message containing the execution result of the command is created and returned to MainWindow#execute.
The ApplicationListPanel is refreshed with a ResultDialog displaying the returned message for 5 seconds.
NOTE: Error handling: Any error message returned in the midst of execution will be displayed as a
ResultDialogand the current command executed terminates immediately.
Why is it implemented this way
The AddContactCommand provides enhancement to the existing AddCommand by separating the process of adding contact details of the company from the initial process of
adding a new internship application. This prevents the AddCommand from getting cluttered with large amount of arguments that may become difficult for the user to remember.
Aspect: Where to save the contact details:
-
Alternative 1 (current choice): Separating it into a separate
Contactclass.- Pros: Flexibility to add more details to the contact if needed in the future.
- Cons: More time required to implement.
-
Alternative 2: Adding contact details as attributes in the
InternshipApplicationclass.- Pros: Easier than implement.
- Cons: More conflicts will occur if someone else is working on the
InternshipApplicationclass at the same time.
Edit contact feature
How is the feature implemented
The edit_contact command allows users to edit the contact of a company added to an internship application. The implementation of the edit_contact command is facilitated by the EditContactCommand class which is derived from the Command superclass, and overrides the Command#execute method.
The parsing process meanwhile involves the InternEaseParser#parseCommand, ContactParser#parseContactCommand and the EditContactCommandParser#parse methods.
The activity diagram below shows the workflow of the edit_contact command during its execution.
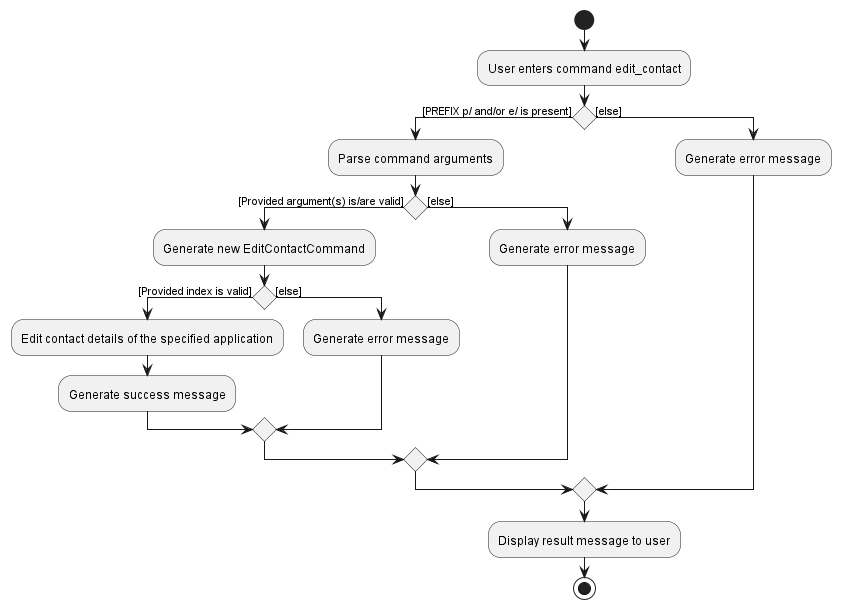
The constructor of the class EditContactCommand requires 2 arguments, a valid positive Integer index and a EditContactDescriptor object, both of which are obtained after the parsing process mentioned above.
The relevant operations from the Model interface are Model#getSortedFilteredInternshipList and Model#setApplication.
A sequence diagram is shown here to illustrate the execution process of the edit_contact command.
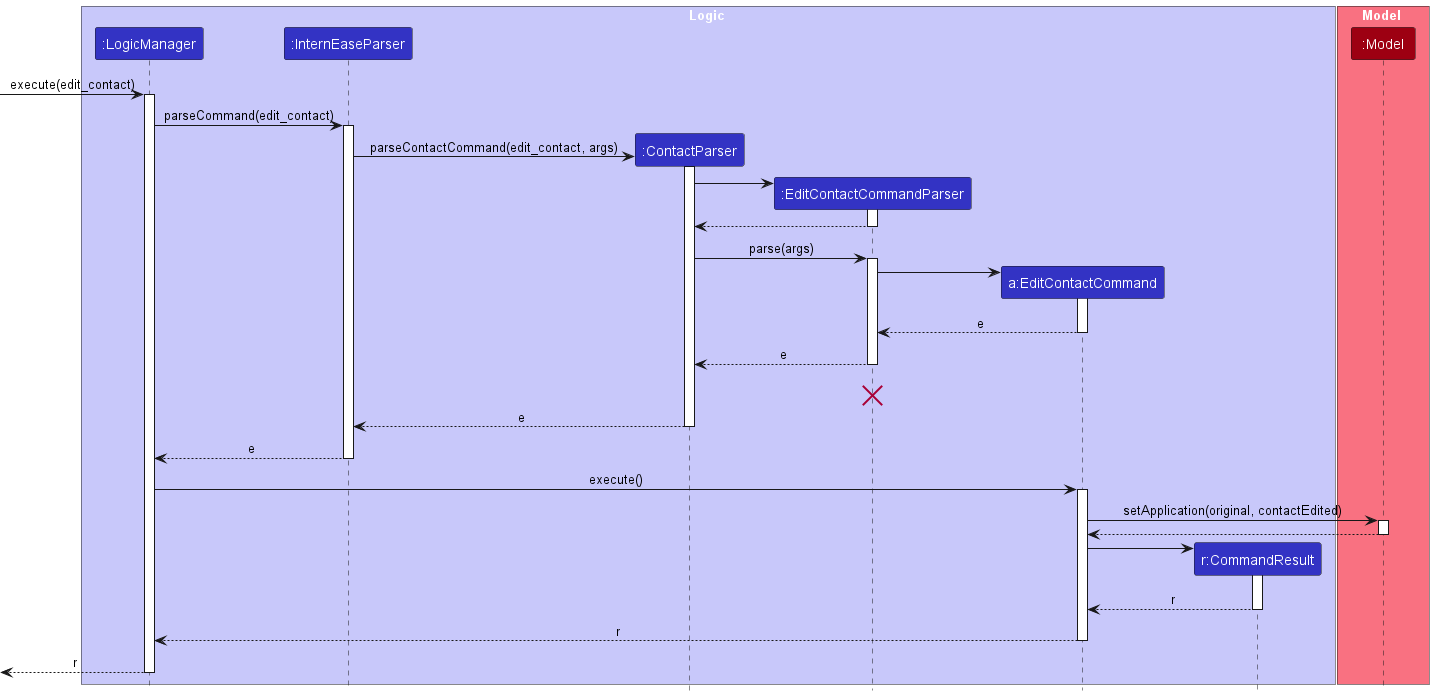
Given below is an explanation on the edit_contact command’s behaviours.
Step 1. Parsing
The CommandBox#execute method is invoked when the user’s input in CommandBox is parsed, which results in the command word being parsed in the method InternEaseParser#parseCommand and subsequently the method ContactParser#parseContactCommand.
The method EditContactCommandParser#parse is invoked only if the command word matches EditContactCommand.COMMAND_WORD.
Step 2. Execution
The EditContactCommand#execute method is invoked and calls are made to the model instance. The last shown list of internships are obtained by calling the method Model#getSortedFilteredInternshipList.
The internship application where the contact is to be edited is then obtained by calling the UniqueApplicationList#get method with the specified index. As the InternshipApplication object is
immutable, a new InternshipApplication object is created with the edited contact details. The Model#setApplication method is then invoked to update the specified application in the list.
Step 3. Result
The updated model is then saved. A CommandResult object with a message containing the execution result of the command is created and returned to MainWindow#execute.
The ApplicationListPanel is refreshed with a ResultDialog displaying the returned message for 5 seconds.
Why is it implemented this way
The EditContactCommand follows the design intuition behind the AddContactCommand by separating the process of editing contact details of the company from the process of
editing other attributes of an existing internship application.
Delete contact feature
How is the feature implemented
The delete_contact command allows users to delete the contact of a company added to an internship application. The implementation of the delete_contact command is facilitated by the DeleteContactCommand class which is derived from the Command superclass, and overrides the Command#execute method.
The parsing process meanwhile involves the InternEaseParser#parseCommand, ContactParser#parseContactCommand and the DeleteContactCommandParser#parse methods.
The activity diagram below shows the workflow of the delete_contact command during its execution.
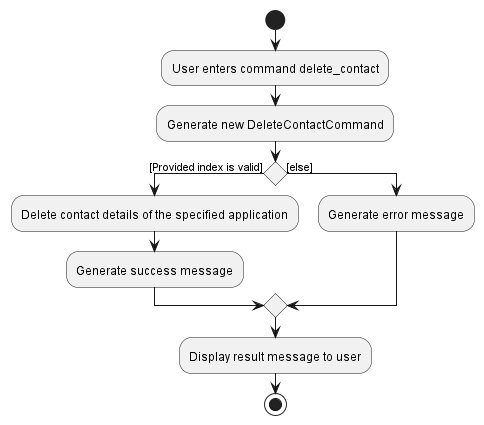
The constructor of the class DeleteContactCommand requires 1 argument, a valid positive Integer index, which is obtained after the parsing process mentioned above.
The relevant operations from the Model interface are Model#getSortedFilteredInternshipList and Model#setApplication.
A sequence diagram is shown here to illustrate the execution process of the delete_contact command.
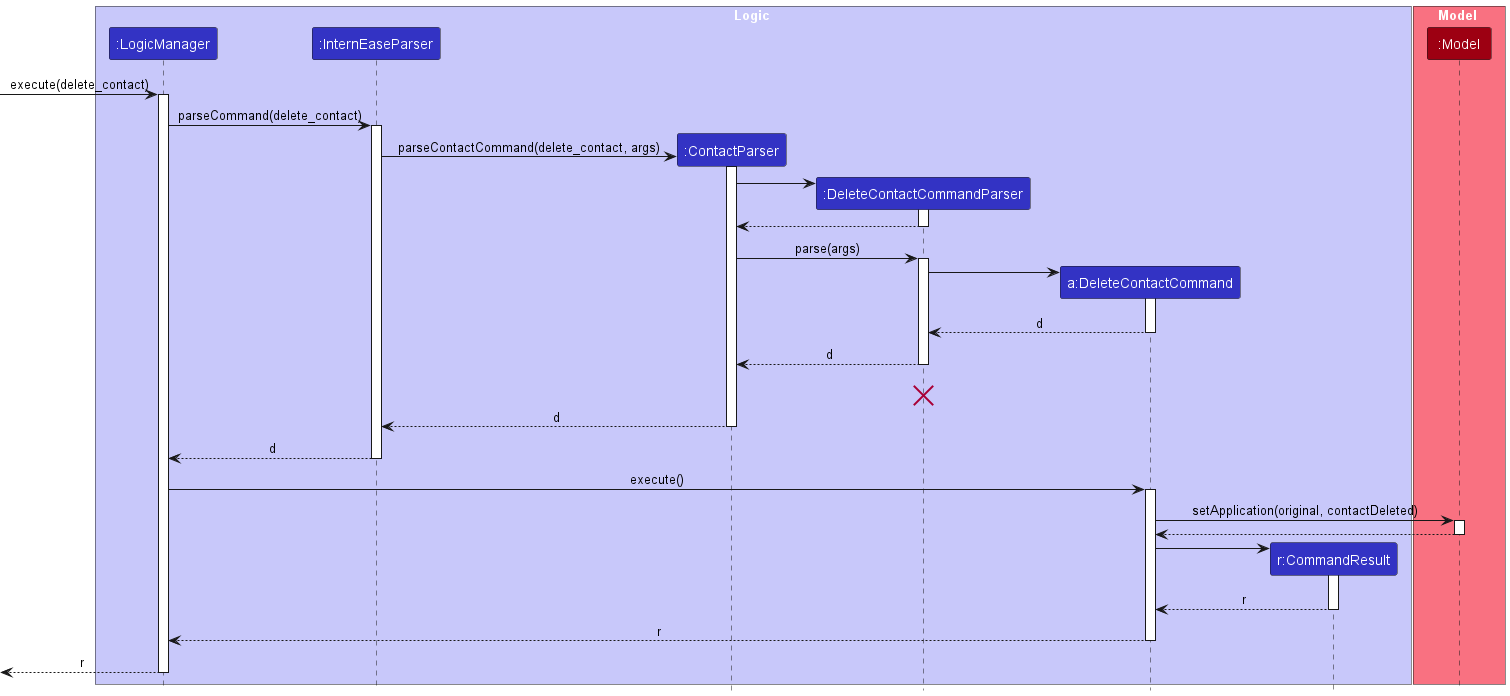
Given below is an explanation on the delete_contact command’s behaviours.
Step 1. Parsing
The CommandBox#execute method is invoked when the user’s input in CommandBox is parsed, which results in the command word being parsed in the method InternEaseParser#parseCommand and subsequently the method ContactParser#parseContactCommand.
The method DeleteContactCommandParser#parse is invoked only if the command word matches DeleteContactCommand.COMMAND_WORD.
Step 2. Execution
The DeleteContactCommand#execute method is invoked and calls are made to the model instance. The last shown list of internships are obtained by calling the method Model#getSortedFilteredInternshipList.
The internship application where the contact is to be edited is then obtained by calling the UniqueApplicationList#get method with the specified index. As the InternshipApplication object is
immutable, a new InternshipApplication object is created with the contact details deleted. The Model#setApplication method is then invoked to update the specified application in the list.
Step 3. Result
The updated model is then saved. A CommandResult object with a message containing the execution result of the command is created and returned to MainWindow#execute.
The ApplicationListPanel is refreshed with a ResultDialog displaying the returned message for 5 seconds.
Why is it implemented this way
The DeleteContactCommand follows the design intuition behind the AddContactCommand by separating the process of deleting contact details of the company from the process of
deleting other attributes of an existing internship application.
List feature
How is the feature implemented
The list command lists all ongoing internship applications, i.e. excluding archived applications. Once the list command is executed,
it updates the predicate of FilteredInternshipList in model to show only currently ongoing applications. All commands to be executed following this command
will follow the index of the latest list displayed in the internship application panel.
The execution process of list_archived is demonstrated by the activity diagram below.
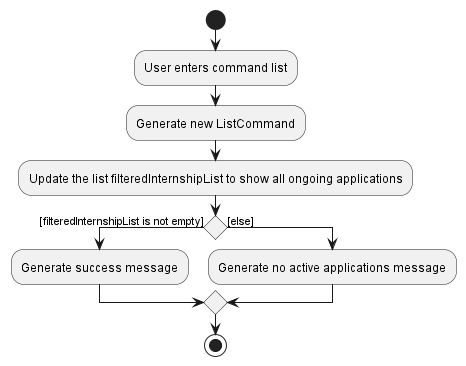
Add documents feature
How is the feature implemented
The add_docs command allows users to add links of the documents submitted to a company to an internship application. The implementation of the add_docs command is facilitated by the AddDocumentsCommand class which is derived from the Command superclass, and overrides the Command#execute method.
The parsing process meanwhile involves the InternEaseParser#parseCommand, DocumentsParser#parseDocumentsCommand and the AddDocumentsCommandParser#parse methods.
The activity diagram below shows the workflow of the add_docs command during its execution.
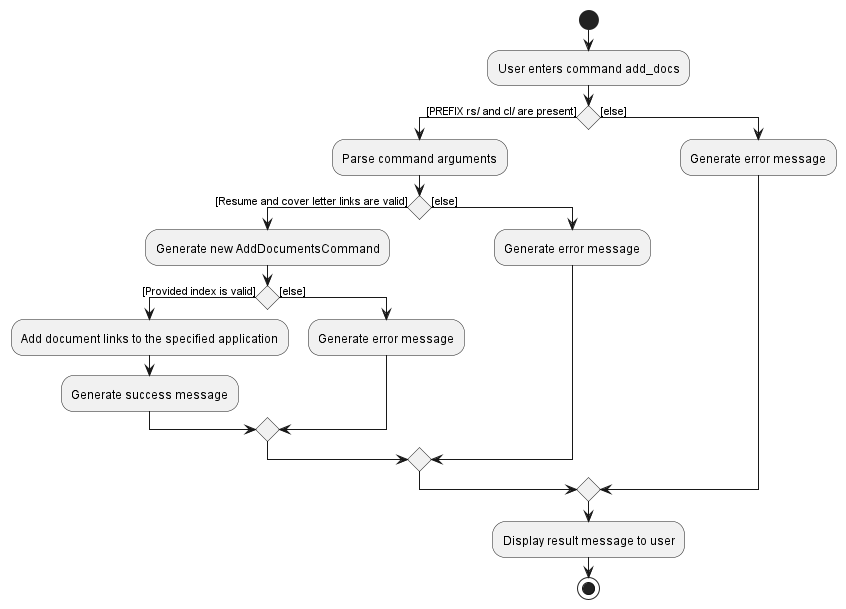
The constructor of the class AddDocumentsCommand requires 2 arguments, a valid positive Integer index and a Documents object, both of which are obtained after the parsing process mentioned above.
The relevant operations from the Model interface are Model#getSortedFilteredInternshipList and Model#setApplication.
A sequence diagram is shown here to illustrate the execution process of the add_docs command.
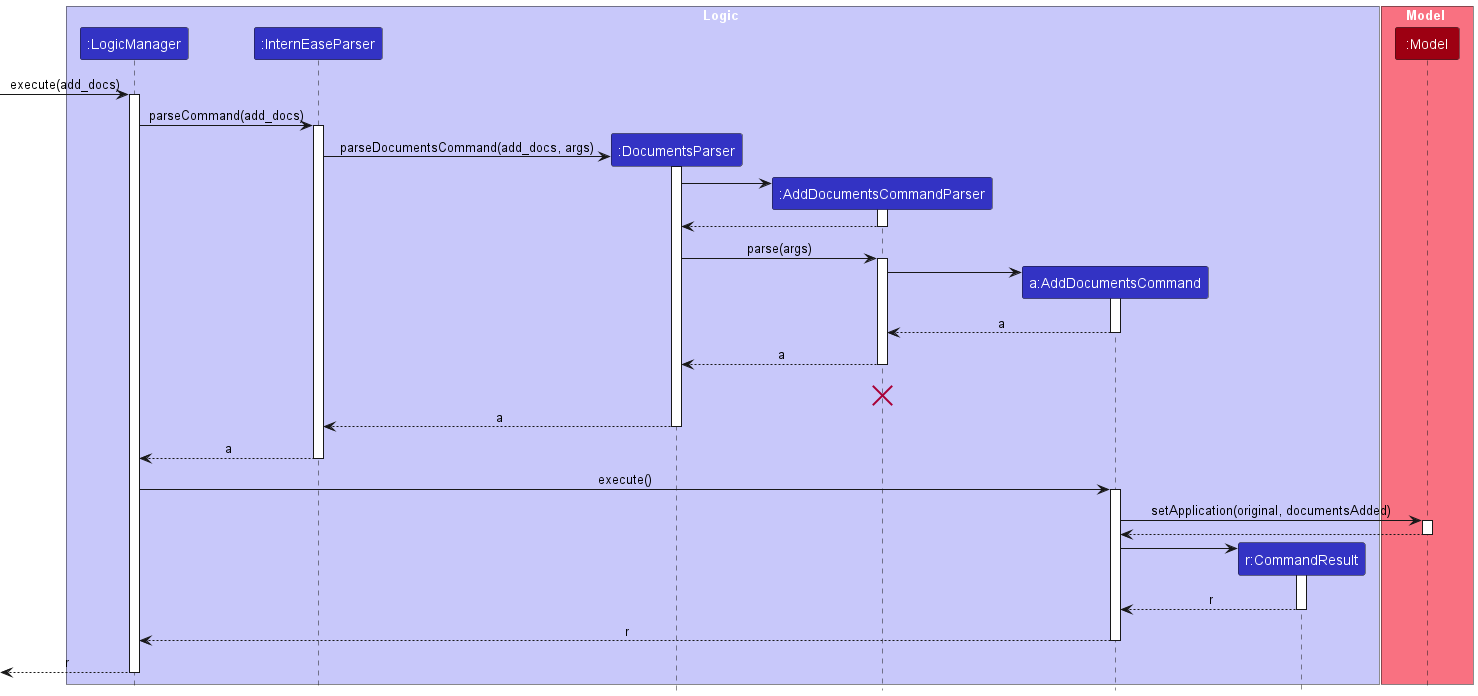
Given below is an explanation on the add_docs command’s behaviours.
Step 1. Parsing
The CommandBox#execute method is invoked when the user’s input in CommandBox is parsed, which results in the command word being parsed in the method InternEaseParser#parseCommand and subsequently the method DocumentsParser#parseDocumentsCommand.
The method AddDocumentsCommandParser#parse is invoked only if the command word matches AddDocumentsCommand.COMMAND_WORD.
Step 2. Execution
The AddDocumentsCommand#execute method is invoked and calls are made to the model instance. The last shown list of internships are obtained by calling the method Model#getSortedFilteredInternshipList.
The internship application where the document links are to be added is then obtained by calling the UniqueApplicationList#get method with the specified index. As the InternshipApplication object is
immutable, a new InternshipApplication object is created with the document links. The Model#setApplication method is then invoked to update the specified application in the list.
Step 3. Result
The updated model is then saved. A CommandResult object with a message containing the execution result of the command is created and returned to MainWindow#execute.
The ApplicationListPanel is refreshed with a ResultDialog displaying the returned message for 5 seconds.
Why is it implemented this way
The AddDocumentsCommand provides enhancement to the existing AddCommand, in a similar fashion to the AddContactCommand.
Edit documents feature
How is the feature implemented
The edit_docs command allows users to edit links of the documents submitted to a company to an internship application. The implementation of the edit_docs command is facilitated by the EditDocumentsCommand class which is derived from the Command superclass, and overrides the Command#execute method.
The parsing process meanwhile involves the InternEaseParser#parseCommand, DocumentsParser#parseDocumentsCommand and the EditDocumentsCommandParser#parse methods.
The execution process of the edit_docs command can be demonstrated by the activity diagram of edit_contact by replacing contact related phrases or methods with documents related phrases or methods.
Delete documents feature
How is the feature implemented
The delete_docs command allows users to delete links of the documents added to an internship application. The implementation of the edit_docs command is facilitated by the DeleteDocumentsCommand class which is derived from the Command superclass, and overrides the Command#execute method.
The parsing process meanwhile involves the InternEaseParser#parseCommand, DocumentsParser#parseDocumentsCommand and the DeleteDocumentsCommandParser#parse methods.
The execution process of the delete_docs command can be demonstrated by the activity diagram of delete_contact by replacing contact related phrases or methods with documents related phrases or methods.
Edit status feature
How is the feature implemented
The edit_status command allows users to edit the status of an internship application. The implementation of the edit_status command is facilitated by the EditStatusCommand class which is derived from the Command superclass, and overrides the Command#execute method.
The parsing process meanwhile involves the InternEaseParser#parseCommand and the EditStatusCommandParser#parse methods.
The activity diagram below shows the workflow of the edit_status command during its execution.
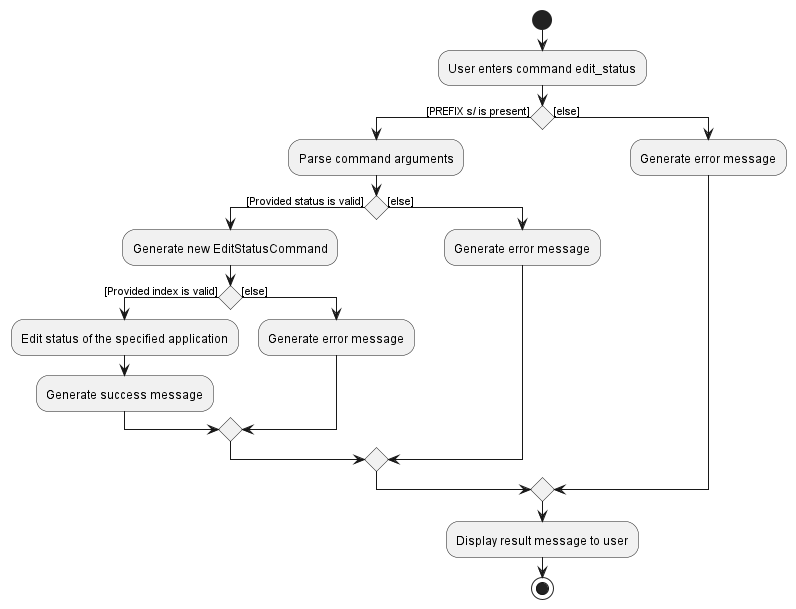
The constructor of the class EditStatusCommand requires 2 arguments, a valid positive Integer index and a InternshipStatus object, both of which are obtained after the parsing process mentioned above.
The relevant operations from the Model interface are Model#getSortedFilteredInternshipList and Model#setApplication.
A sequence diagram is shown here to illustrate the execution process of the edit_contact command.
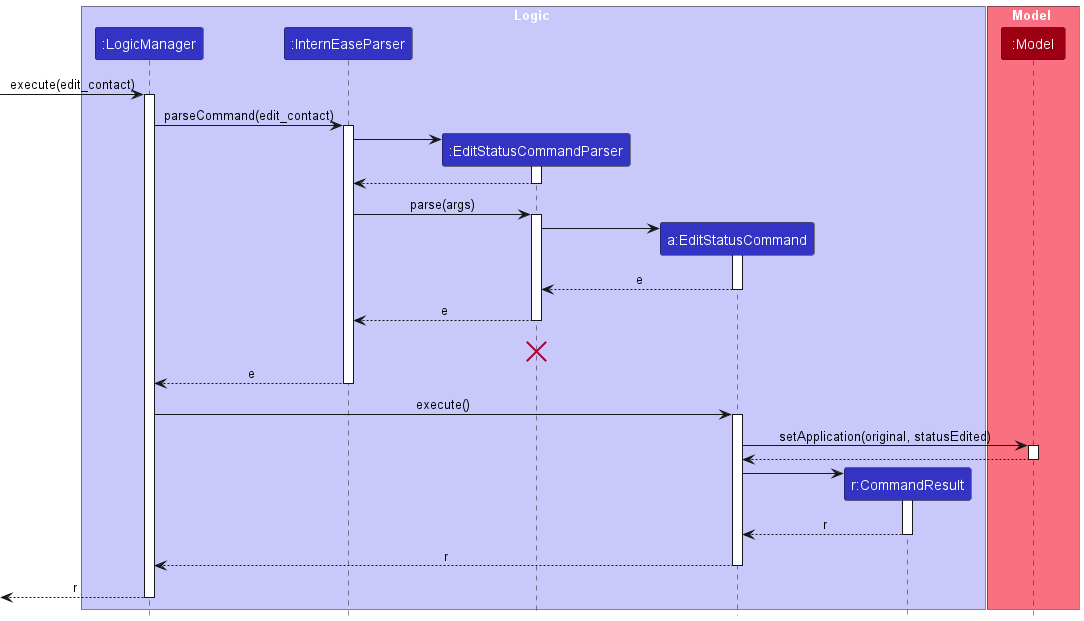
Given below is an explanation on the edit_status command’s behaviours.
Step 1. Parsing
The CommandBox#execute method is invoked when the user’s input in CommandBox is parsed, which results in the command word being parsed in the method InternEaseParser#parseCommand.
The method EditStatusCommandParser#parse is invoked only if the command word matches EditStatusCommand.COMMAND_WORD.
Step 2. Execution
The EditContactCommand#execute method is invoked and calls are made to the model instance. The last shown list of internships are obtained by calling the method Model#getSortedFilteredInternshipList.
The internship application where the status is to be edited is then obtained by calling the UniqueApplicationList#get method with the specified index. As the InternshipApplication object is
immutable, a new InternshipApplication object is created with the new status. The Model#setApplication method is then invoked to update the specified application in the list.
Step 3. Result
The updated model is then saved. A CommandResult object with a message containing the execution result of the command is created and returned to MainWindow#execute.
The ApplicationListPanel is refreshed with a ResultDialog displaying the returned message for 5 seconds.
Why is it implemented this way
The EditStatusCommand follows the design intuition behind the EditContactCommand by separating the process of editing status of the internship application from the process of
editing other attributes of an existing internship application.
Archive feature
How is the feature implemented
The archive command allows users to archive an internship application. The implementation of the archive command is facilitated by the ArchiveCommand class which is derived from the Command superclass, and overrides the Command#execute method.
The parsing process meanwhile involves the InternEaseParser#parseCommand and the ArchiveCommandParser#parse methods.
The activity diagram below shows the workflow of the archive command during its execution.
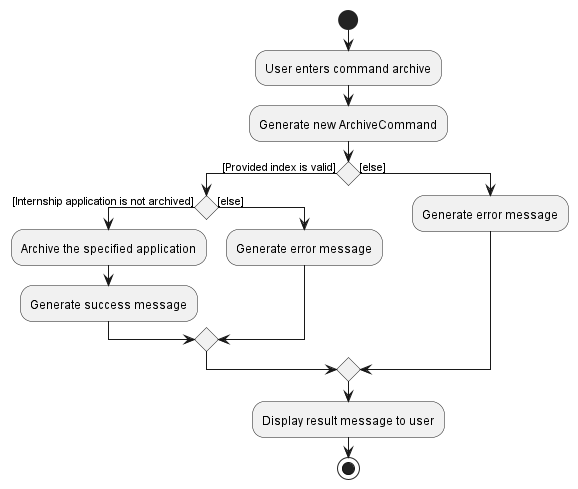
The constructor of the class ArchiveCommand requires 1 argument, a valid positive Integer index, which is obtained after the parsing process mentioned above.
The relevant operations from the Model interface are Model#getSortedFilteredInternshipList and Model#setApplication.
A sequence diagram is shown here to illustrate the execution process of the archive command.
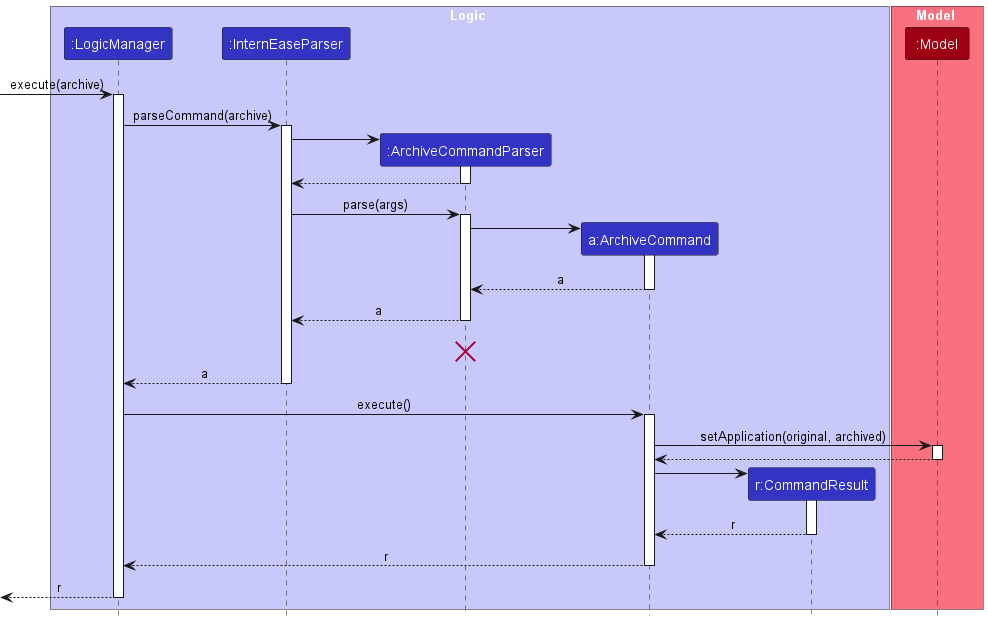
Given below is an explanation on the archive command’s behaviours.
Step 1. Parsing
The CommandBox#execute method is invoked when the user’s input in CommandBox is parsed, which results in the command word being parsed in the method InternEaseParser#parseCommand.
The method ArchiveCommandParser#parse is invoked only if the command word matches ArchiveCommand.COMMAND_WORD.
Step 2. Execution
The ArchiveCommand#execute method is invoked and calls are made to the model instance. The last shown list of internships are obtained by calling the method Model#getSortedFilteredInternshipList.
The internship application to be archived is then obtained by calling the UniqueApplicationList#get method with the specified index. As the InternshipApplication object is
immutable, a new archived InternshipApplication object is created. The Model#setApplication method is then invoked to update the specified application in the list.
Step 3. Result
The updated model is then saved. A CommandResult object with a message containing the execution result of the command is created and returned to MainWindow#execute.
The ApplicationListPanel is refreshed with a ResultDialog displaying the returned message for 5 seconds.
Why is it implemented this way
The ArchiveCommand allows an internship application to be archived in an easier way, as otherwise the user would have to remember a specific prefix
if it is implemented as part of the EditCommand.
Unarchive feature
How is the feature implemented
The unarchive command allows users to unarchive an internship application. The implementation of the unarchive command is facilitated by the UnarchiveCommand class which is derived from the Command superclass, and overrides the Command#execute method.
The parsing process meanwhile involves the InternEaseParser#parseCommand and the UnarchiveCommandParser#parse methods.
The execution process of the unarchive command can be demonstrated by the activity diagram of archive by replacing archive related phrases or methods with unarchive related phrases or methods.
List archived applications feature
How is the feature implemented
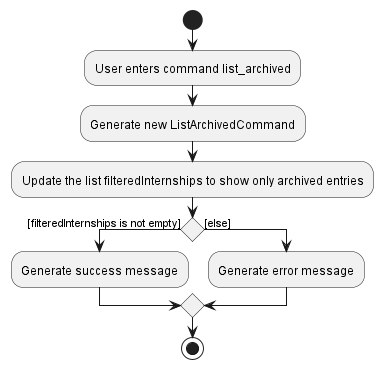
The list_archived command lists all currently archived internship applications. The implementation of the list_archived command is facilitated by the ListArchivedCommand class which is derived from the Command superclass, and overrides the Command#execute method.
The execution of the ListArchivedCommand is similar to the ListCommand.
The execution process of list_archived is demonstrated by the activity diagram below.
Find feature
The find command allows user to find all InternshipApplication whose
-
CompanyNameandJobTitlecontain the specified keyword, or -
Internship statuscontain the specified status, or -
InterviewDateis before, after, or between specified date(s).
NOTE: The matching of keyword in
CompanyNameandJobTitleis case-insensitive. As long as one word within CompanyNameandJobTitle` matches any of the KEYWORDS, it will be shown in result.
How is the feature implemented
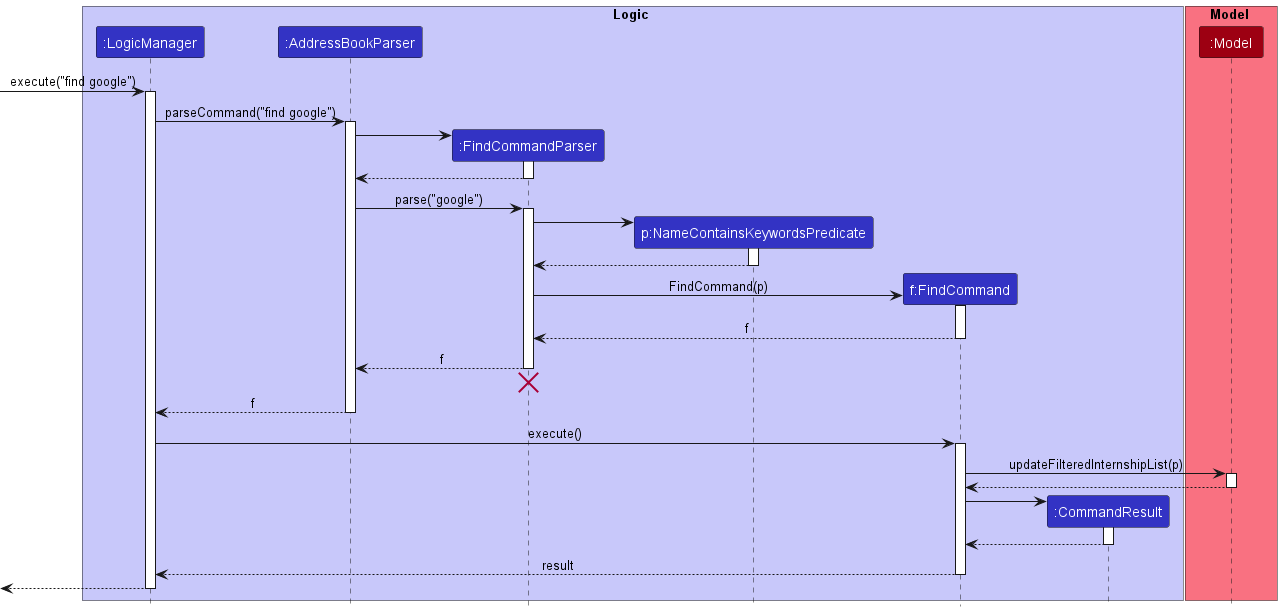
The sequence diagram below describes the interaction between classes when find command is entered.
Step 1. Parsing
If the command word matches the word “find”, FindCommandParser#parse() will be called to parse
the argument of find. The parsing logic is further divided into three cases below:
- Case 1: If the prefix
s/is specified, the argument that follows the prefix immediately is deemed asInternshipStatus. AFindStatusCommandwithStatusPredicateis created to be executed. - Case 2: If one of the following prefixes
before/,after/, ORfrom/andto/is specified, the argument that follows immediately is deemed asInterviewDate. AFindDateCommandwith appropriate subclasses ofDatePredicateis created to be executed. - Case 3: If none of the prefix among
s/,before/,after/,from/,to/is specified in the argument.FindCommandParserconstructs aFindCommandobject and treat all arguments that follow asKEYWORD
Step 2. Execution
The corresponding command is then invoked. Within each command’s execute method,
Model#updateFilteredInternshipList() is invoked by passing in the predicate. For Cases 1 and 2,
only those InternshipApplication’s with matching ApplicationStatus or InterviewDate are added to the Model’s
filteredInternships whereas for Case 3, if any word within the CompanyName or JobTitle matches one of the
KEYWORD(s), then that application is added to the Model’s filteredInternships.
Step 3. Result
The updated model is then saved. A CommandResult object with a message containing the execution result of the command
is created and returned to MainWindow#execute. The ApplicationListPanel is refreshed with a ResultDialog
displaying the returned message for 5 seconds.
Why is it implemented this way
The class diagram below shows current structure of classes related to find command.
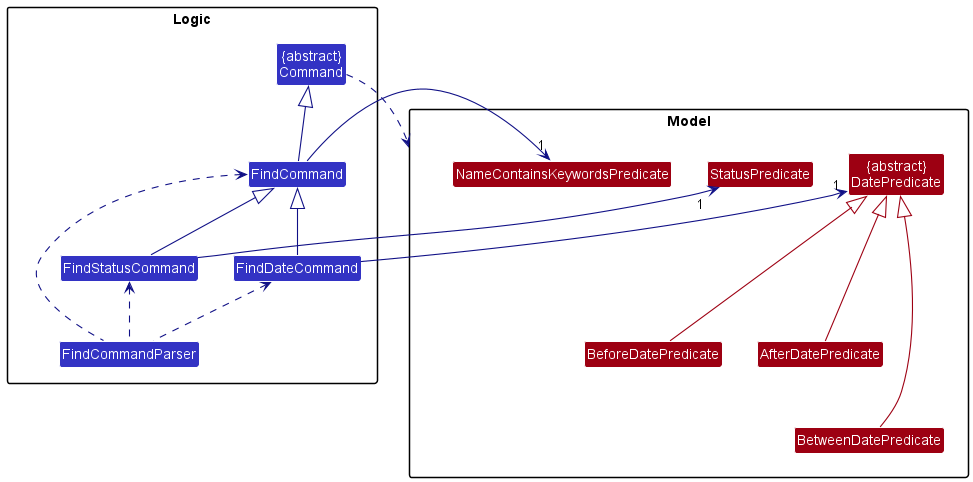
It is designed and implemented in this way to make the find command more extensible to further enhancement to be made.
For example, developer may want to enable more prefixes that be searched using the search command. By the
use of inheritance, one can easily modify the behaviour of find command through overrding of the execute command
and rely on polymorphism.
Alternatives considered
Syntax of find command
-
Alternative 1 (current choice): Now to find attribute in
InternshipApplication, the command syntax used is by using its prefix, i.e. in this formfind s/PENDING.- Pros: shorter command
- Cons: Parser logic is harder to maintain as compared to Alternative 2
-
Alternative 2: We can also make it in such format find_
, e.g. find_status. - Pros: Easy parser to implement
- Cons: Longer command which takes longer time to type
Sort feature
The sort command allows user to sort all InternshipApplication by the order below:
-
CompanyName(alphabetical order) -
JobTitle(alphabetical order) -
Internship status(the default order of status) -
InterviewDate(ascending order of the interview date,InternshipApplicationhaving null values are placed at the end).
NOTE: The alphabetical order for comparing
CompanyNameandJobTitleis case-insensitive. To illustrate, theInternshipApplicationwithCompanyName“amazon” should appear before that withCompanyName“Google”.
How is the feature implemented
The sequence diagram below describes the interaction between classes when sort command is entered.
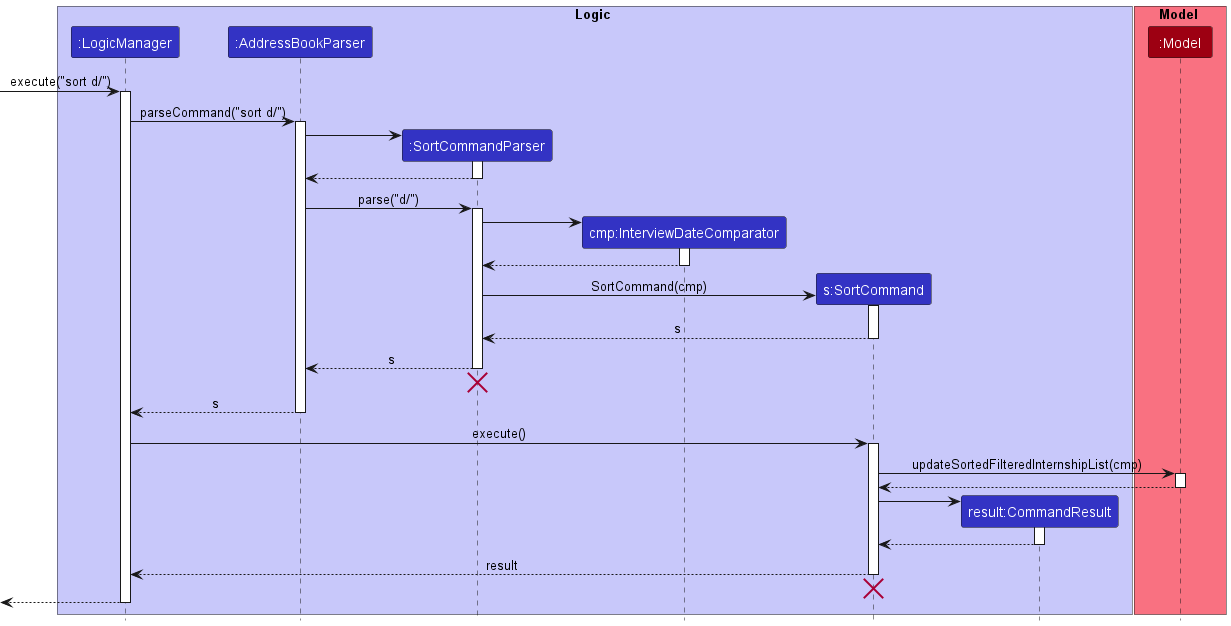
Step 1. Parsing
If the command word matches the word “sort”, SortCommandParser#parse() will be called to parse
the argument of sort. Depending on the argument of sort, the corresponding comparator will be created. The sort command
is then created with appropriate comparator.
Step 2. Execution
The SortCommand#execute method is then invoked. The Model#updateSortedFilteredInternshipList() is invoked by passing in the comparator.
The underlying SortedList is the updated and sorted by using the Comparator being passed.
Step 3. Result
The updated model is then saved. A CommandResult object with a message containing the execution result of the command
is created and returned to MainWindow#execute. The ApplicationListPanel is refreshed with a ResultDialog
displaying the returned message for 5 seconds.
Why is it implemented this way
It is designed and implemented in this way to make the sort command more extensible to further enhancement to be made.
For example, developer may want to provide more sorting order using the sort command. By the
use of inheritance, one can easily enhance the sort command by passing appropriate implementation of Comparator object
to sort the underlying list of InternshipApplication’s by polymorphism.
Clear feature
This section elaborated the clear feature by its functionality and the path of execution together with the ClearCommand implementation. Uml diagram is used to aid this description.
How CLEAR Feature is implemented
The clear feature enables user to clear all internship applications in the current internship application list.
The execution process of clear is demonstrated by the sequence diagram below.
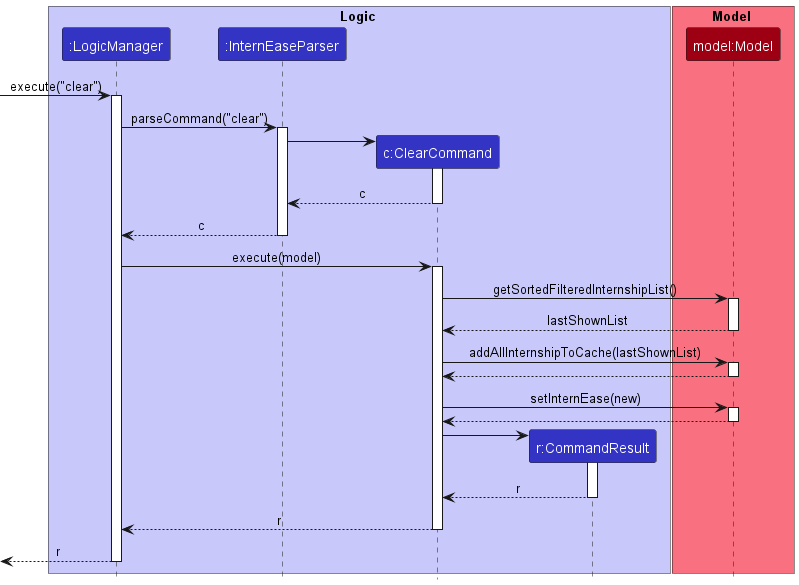
Given below is a step-wise explanation on clear mechanism’s behaviour.
Step 1. Parsing
The user input in the CommandBox will trigger CommandBox#execute, will result in the command word processing in InternEaseParser#parse. If the COMMAND.WORD matches clear.
Step 2. Execution
ClearCommand#execute is called with model instance. It attempts to get full list of Internship Applications by Model#getSortedFilteredInternshipList.
If the application list is currently not empty, Model#setInternEase empties the application list by replacing it with a new InternEase instance while Model#addAllInternshipToCache adds the entire list into the cacheList.
Step 3. Result
The result model is saved. A CommandResult with execution result message is returned until the MainWindow#execute. The ApplicationListPanel is refreshed with a ResultDialog displaying the execution message for 5 seconds.
NOTE:
Error handling: Any error message resulted in the midst of execution will be displayed as aResultDialogand current execution terminates immediately.
Why is it implemented this way
The ClearFeature is an enhanced extension for the DeleteFeature. It provides an execution for a series operations of the DeleteCommands at once. Furthermore, it is made reversible by adding the entries into a cacheList immediately after clearing them.
Clear By feature
This section elaborated the clear_by feature by its functionality and the path of execution together with the ClearByCommand implementation. Uml diagrams are used to aid this description.
How CLEAR_BY Feature is implemented
The clear_by feature enables user to clear the internship applications in batch with the specific attribute and the specific keyword. There are 3 cases (attributes) available in this feature.
In Logic interface, ClearByCommand extends Command with a ClearByCommand#execute functionality. The parsing process is facilitated by both the InternEaseParser#parse and ClearByCommandParser#parse.
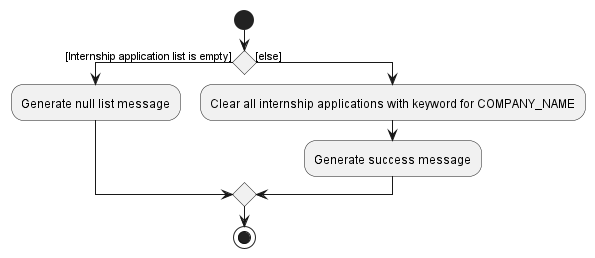
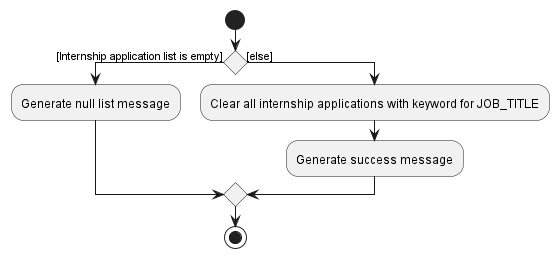
The workflow of a clear_by command during its execution is shown by the activity diagrams below, the alternatives of the main diagrams are shown in 3 break-downs activity diagram below:
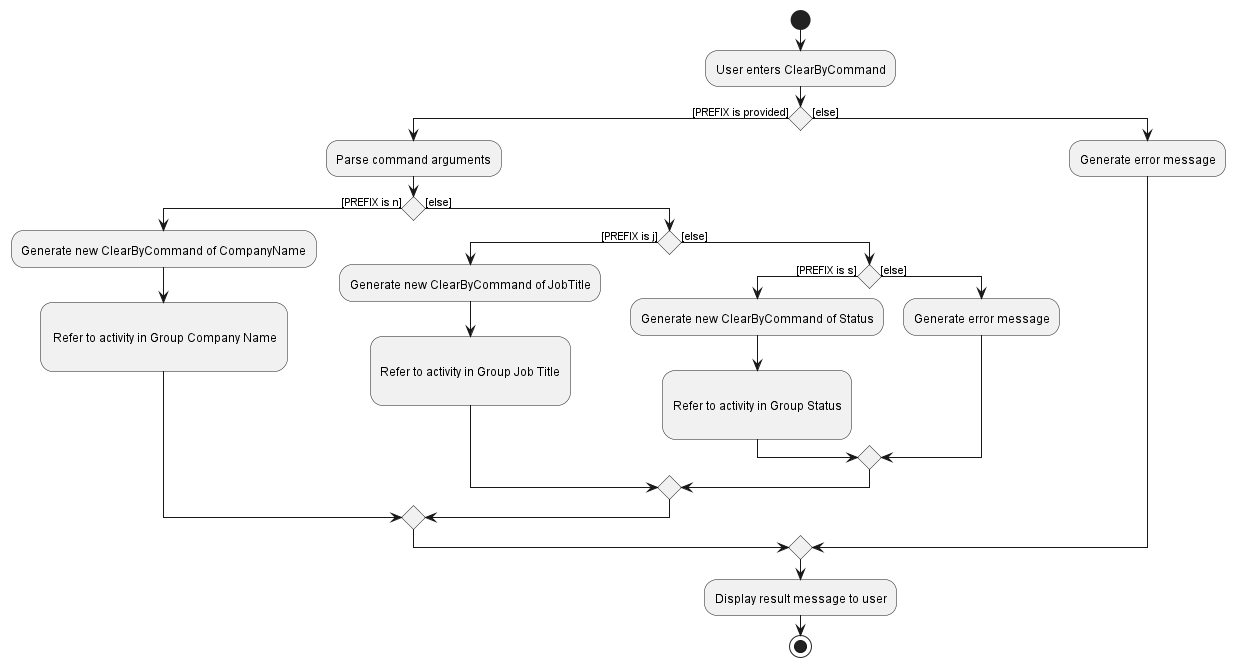
Group - Company Name
Group - Job Title
Group - Status
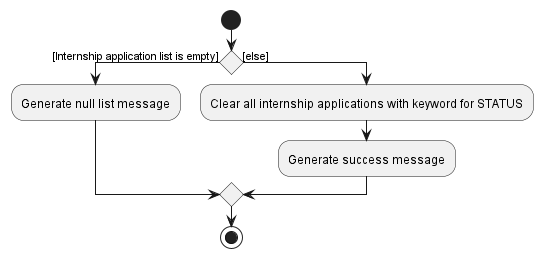
There are 3 constructors ClearByCommand::new provided for 3 different cases stated below :
- Case 1 : clear_by
COMPANY_NAME-
PREFIXshould be set ton - Allows user to remove all internship applications with
ParamType=COMPANY_NAMEfully match with the entire provided keyword (case-sensitive).
-
- Case 2 : clear_by
JOB_TITLE-
PREFIXshould be set toj - Allows user to remove all internship applications with
ParamType=JOB_TITLEfully match with the entire provided keyword (case-sensitive).
-
- Case 3 : clear_by
STATUS-
PREFIXshould be set tos, the keywords accepted includeACCEPTED, PENDING, RECEIVED, REJECTED, DECLINED. - Allows user to remove all internship applications with
ParamType=STATUSfully match with the correct provided keyword (case-sensitive).
-
Note: The assignation of cases will be done by
ClearByCommandParser#parse, each unavailable fields will be set to null.
These operations are involved in the Model interface as Model#getSortedFilteredInternshipList, Model#addInternshipToCache and Model#deleteInternship
The execution process of Clear_by is demonstrated by the sequence diagram below.
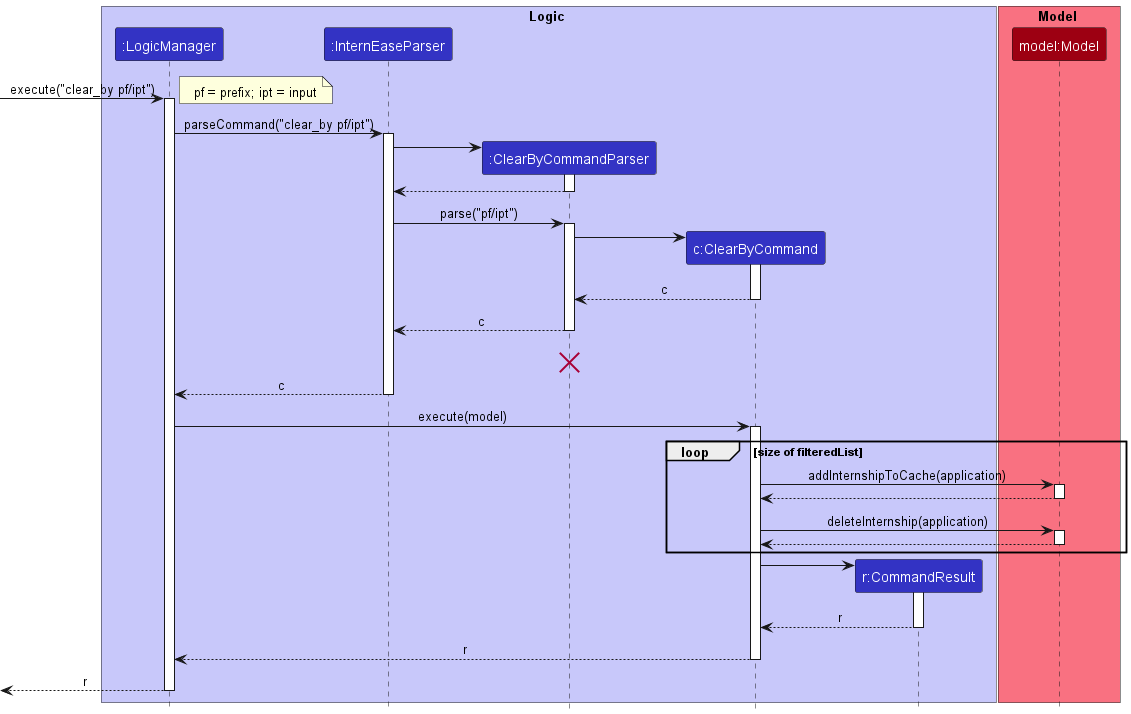
Given below is a step-wise explanation on clear_by mechanism’s behaviour.
Step 1. Parsing
The user input in the CommandBox will trigger CommandBox#execute, will result in the command word processing in InternEaseParser#parse. If the COMMAND.WORD matches clear_by, it will then be passed to ClearByCommandParser#parse.
The PREFIX in the argument will then be investigated. Different constructor of ClearByCommand object will be using based on the PREFIX.
Step 2. Execution
ClearByCommand#execute is called with model instance. It attempts to get full list of Internship Applications by Model#getSortedFilteredInternshipList. Then, the list is filtered by ClearByCommand#getFilteredList to filter out the applications to be cleared.
The size of the list-to-clear is checked before an iteration to Model#deleteInternship and Model#addInternshipToCache. The cleared items are stored in the cacheList to support RevertCommand in current InternEase session.
Step 3. Result
The result model is saved. A CommandResult with execution result message is returned until the MainWindow#execute. The ApplicationListPanel is refreshed with a ResultDialog displaying the execution message for 5 seconds.
NOTE:
Error handling: Any error message resulted in the midst of execution will be displayed as aResultDialogand current execution terminates immediately.
Why is it implemented this way
The ClearByCommand is an enhanced feature for both DeleteCommand and ClearCommand. It resolves user’s request to perform customized batch deletion of internship applications.
Based on utility, the 3 fixed fields in an internship application are taken as the key attributes for this clear_by feature. The PREFIX for specifying the clear_by attribute is also the same as InternEase convention.
For the ease of implementation and avoid ambiguity, constructor ClearByCommand::new is overloaded, taking different fields. The usage of enum ParamType to specify the operating attribute type generalized the ClearByCommand#execute.
The other implementation aspects of clear_by feature follow the convention of InternEase.
Delete feature
This section elaborated the delete feature by its functionality and the path of execution together with the DeleteCommand implementation. Uml diagram is used to aid this description.
How DELETE Feature is implemented
The delete feature enables user to delete an internship applications with the specified index.
In Logic interface, DeleteCommand extends Command with a DeleteCommand#execute functionality. The parsing process is facilitated by both the InternEaseParser#parse and DeleteCommandParser#parse.
All the delete operations should only have INDEX within the displayed Internship Application List.
The deleted application(s) in current session (after InternEase initialization, before exit) will be cached in a cacheList to enable the revert and revert_all features.
These operations are involved in the Model interface as Model#getSortedFilteredInternshipList, Model#addInternshipToCache and Model#deleteInternship
The execution process of delete is demonstrated by the sequence diagram below.

Given below is a step-wise explanation on delete mechanism’s behaviour.
Step 1. Parsing
The user input in the CommandBox will trigger CommandBox#execute, will result in the command word processing in InternEaseParser#parse. If the COMMAND.WORD matches delete, it will then be passed to DeleteCommandParser#parse.
The INDEX in the argument will then be investigated.
Step 2. Execution
DeleteCommand#execute is called with model instance. It attempts to get full list of Internship Applications by Model#getSortedFilteredInternshipList. The INDEX is checked against the size of the current Internship Application to ensure that it is within the desired range.
The internshipToDelete is retrieved from the filteredList and deleted from the model by Model#deleteInternship. The deleted item is stored in the cacheList to support RevertCommand and RevertAllCommand in the current InternEase session.
Step 3. Result
The result model is saved. A CommandResult with execution result message is returned until the MainWindow#execute. The ApplicationListPanel is refreshed with a ResultDialog displaying the execution message for 5 seconds.
NOTE:
Error handling: Any error message resulted in the midst of execution will be displayed as aResultDialogand current execution terminates immediately.
Why is it implemented this way
The DeleteCommand is a common, must-have feature which helps to clean-up unwanted internship applications to enhance user experience. The cacheList provides an extra protection to the data to buffer the effect of this destructive operation.
Revert feature
This section elaborated the revert feature by its functionality and the path of execution together with the RevertCommand implementation. Uml diagram is used to aid this description.
How REVERT Feature is implemented
The revert feature enables user to revert the most recent deleted internship applications.
In Logic interface, RevertCommand extends Command with a RevertCommand#execute functionality. The parsing process is facilitated by the InternEaseParser#parse.
All the revert operations can be operated when the cacheList for the current session is not empty. The reverted application(s) in current session (after InternEase initialization, before exit) will be removed from the cacheList and be added to the end of the current internship application list.
These operations are involved in the Model interface as Model#getCachedInternshipList, Model#getAndRemoveCachedApplication and Model#addApplication.
The execution process of revert is demonstrated by the activity diagram below.
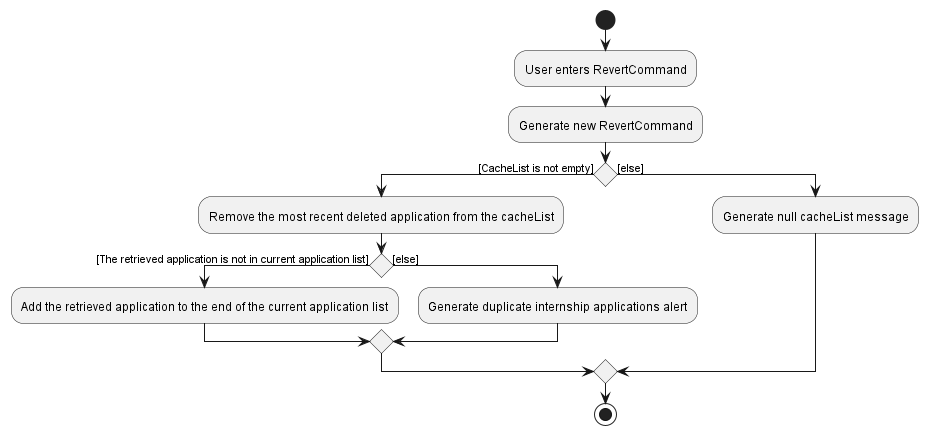
Given below is a step-wise explanation on revert mechanism’s behaviour.
Step 1. Parsing
The user input in the CommandBox will trigger CommandBox#execute, will result in the command word processing in InternEaseParser#parse. If the COMMAND.WORD matches revert.
Step 2. Execution
RevertCommand#execute is called with model instance. It attempts to get full list of cached Internship Applications by Model#getCachedInternshipList.
The most recent cached Internship Application is retrieved from the cacheList and deleted from it by Model#getAndRemoveCachedApplication. The retrieved item is added back to the end of the internship application list by Model#addApplication.
Step 3. Result
The result model is saved. A CommandResult with execution result message is returned until the MainWindow#execute. The ApplicationListPanel is refreshed with a ResultDialog displaying the execution message for 5 seconds.
NOTE:
Error handling: Any error message resulted in the midst of execution will be displayed as aResultDialogand current execution terminates immediately.
Why is it implemented this way
The RevertFeature adds an extra cacheList provides an extra protection to the data to counter the destructive effect of the ClearFeatures and the DeleteFeature. The cacheList does not write in the memory space to provide
a temporary data-storing data structure that acts as a buffer for the current session’s operations.
Alternatives considered
Functionality of revert command
-
Alternative 1 (current choice): Currently, only the revert of a single deleted / cleared internship application is available.
- Pros: Shorter command, easy to implement.
- Cons: Less efficient as compared to Alternative 2.
-
Alternative 2: We can also make it in such format
revert INDEX, e.g. revert 3 (reverts 3 most recent deleted internship applications).- Pros: More powerful feature.
- Cons: More complicate to implement.
Revert All feature
This section elaborated the revert_all feature by its functionality and the path of execution together with the RevertAllCommand implementation. Uml diagram is used to aid this description.
How REVERT_ALL Feature is implemented
The revert_all feature enables user to revert all deleted and cleared internship applications in the current session (after InternEase initialization, before exit).
The execution process of revert_all is demonstrated by the sequence diagram below.
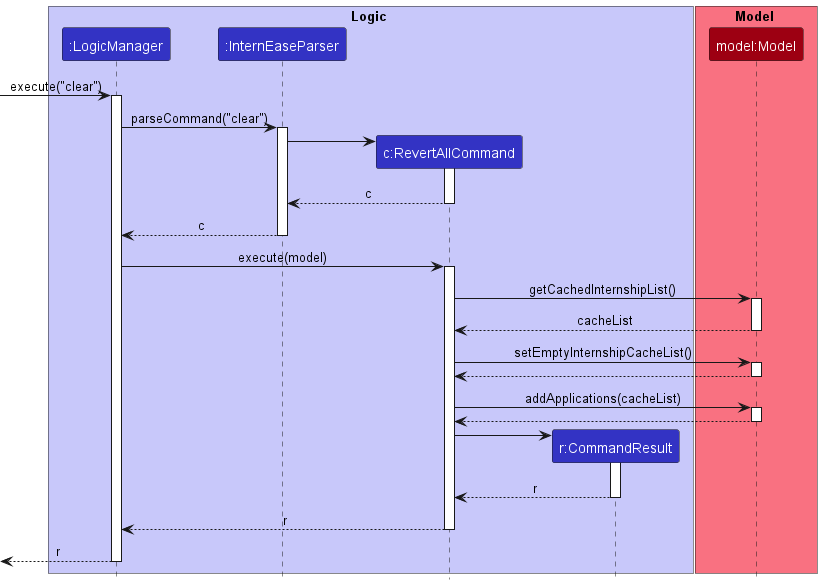
Given below is a step-wise explanation on revert_all mechanism’s behaviour.
Step 1. Parsing
The user input in the CommandBox will trigger CommandBox#execute, will result in the command word processing in InternEaseParser#parse. If the COMMAND.WORD matches revert_all.
Step 2. Execution
RevertAllCommand#execute is called with model instance. It attempts to get full list of cached Internship Applications by Model#getCachedInternshipList.
If the cacheList is currently not empty, Model#setEmptyInternshipCacheList empties the cacheList while Model#addApplications adds the entire list to the end of the current internship application list.
Step 3. Result
The result model is saved. A CommandResult with execution result message is returned until the MainWindow#execute. The ApplicationListPanel is refreshed with a ResultDialog displaying the execution message for 5 seconds.
NOTE:
Error handling: Any error message resulted in the midst of execution will be displayed as aResultDialogand current execution terminates immediately.
Why is it implemented this way
The RevertAllFeature is an enhanced extension for the RevertFeature. It provides an execution for the series operations of the RevertFeatures at once.
Remind feature
This section elaborated the remind by its functionality and the path of execution together with the RemindCommand implementation.
How Remind Feature is implemented
The remind feature enables users to view the details of the application with the most imminent interview date.
Given below is a step-wise explanation on remind mechanism’s behaviour.
Step 1. Parsing
The user input in the CommandBox will trigger CommandBox#execute, will result in the command word processing in InternEaseParser#parse. If the COMMAND.WORD matches remind.
Step 2. Execution
RemindCommand#Execute is called with a model instance. It directly returns a command result with showReminder set to True.
Step 3. Result
A CommandResult with execution result message is returned until the MainWindow#execute. The ResultDialog displays the execution message for 5 seconds. MainWindow#handleReminder handles the remind operation by showing or focusing on the reminder window.
NOTE:
Error handling: Any error message resulted in the midst of execution will be displayed as aResultDialogand current execution terminates immediately.
Why is it implemented this way
The RemindFeature is a good to have feature. Existing reminder window is cleaned-up upon executing commands to prevent multiple windows from clogging up the screen.
Exit feature
This section elaborated the exit feature by its functionality and the path of execution together with the ExitCommand implementation. Uml diagram is used to aid this description.
How Exit Feature is implemented
The exit feature enables user to close InternEase using CLI command.
The execution process of exit is demonstrated by the sequence diagram below.
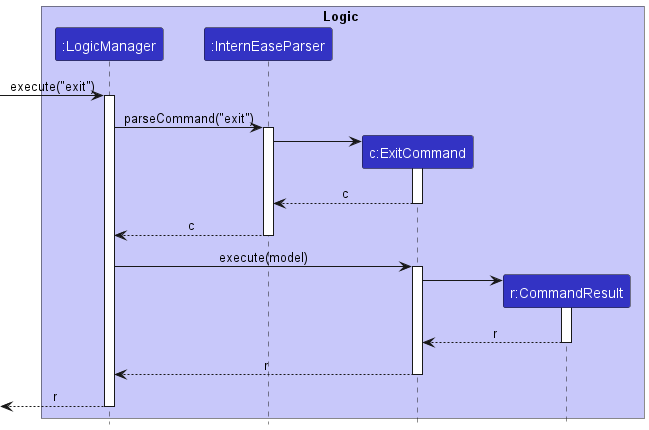
Given below is a step-wise explanation on exit mechanism’s behaviour.
Step 1. Parsing
The user input in the CommandBox will trigger CommandBox#execute, will result in the command word processing in InternEaseParser#parse. If the COMMAND.WORD matches exit.
Step 2. Execution
ExitCommand#execute is called with model instance. It directly returns a command result with exit parameter being set to True.
Step 3. Result
A CommandResult with execution result message is returned until the MainWindow#execute. The ResultDialog displays the execution message for 5 seconds.
MainWindow#handleExit handle the exit operation by recording current gui settings and hiding all the opened windows. The InternEase software shuts down eventually.
NOTE:
Error handling: Any error message resulted in the midst of execution will be displayed as aResultDialogand current execution terminates immediately.
Why is it implemented this way
The ExitFeature is a general, must-have feature. All the windows are cleaned-up upon exit to prevent illegal running of InternEase processes and the trigger of null-pointer exceptions.
The ExitFeature also acts as the termination point for cacheList usage in the current session.
Add Interview Date feature
How is the feature implemented
The add_date command allows users to add an interview date to an internship application. The implementation of the add_date command is facilitated by the AddInterviewDateCommand class which is derived from the Command superclass, and overrides the Command#execute method.
The parsing process meanwhile involves the AddressBookParser#parse# and the AddInterviewDateCommandParser#parse methods.
The constructor of the class AddInterviewDateCommand requires 2 arguments, a valid positive Integer index and a InterviewDate object, both of which are obtained after the parsing process mentioned above.
The relevant operations from the Model interface are Model#getFilteredInternshipList, Model#setApplication and Model#updateFilteredInternshipList.
Given below is an explanation on the add_date command’s behaviours.
Step 1. Parsing
The CommandBox#execute method is invoked when the user’s input in CommandBox is parsed, which results in the command word being parsed in the method InternEaseParser#parser.
The method AddInterviewDateCommandParser#parse is invoked only if the command word matches AddInterviewDateCommand.COMMAND_WORD.
Step 2. Execution
The AddInterviewDateCommand#execute method is invoked and calls are made to the model instance. The last shown list of internships are obtained by calling the method Model#getFilteredInternshipList.
The internship application where the interview date is to be added is then obtained by calling the UniqueApplicationList#get method with the specified index. As the InternshipApplication object is
immutable, a new InternshipApplication object is created with the interview date. The Model#setApplication method is then invoked to update the specified application in the list.
Step 3. Result
The updated model is then saved. A CommandResult object with a message containing the execution result of the command is created and returned to MainWindow#execute.
The ApplicationListPanel is refreshed with a ResultDialog displaying the returned message for 5 seconds.
NOTE: Error handling: Any error message returned in the midst of execution will be displayed as a
ResultDialogand the current command executed terminates immediately.
Why is it implemented this way
The AddInterviewDateCommand provides enhancement to the existing AddCommand by separating the process of adding the interview date for an application from the initial process of
adding a new internship application. This prevents the AddCommand from getting cluttered with large amount of arguments that may become difficult for the user to remember.
Aspect: Where to save the interview date details:
-
Alternative 1 (current choice): Separating it into a separate
InterviewDateclass.- Pros: Flexibility to add more details to the interview date if needed in the future.
- Cons: More time required to implement.
-
Alternative 2: Adding interview date as an attribute in the
InternshipApplicationclass.- Pros: Easier than implement.
- Cons: More conflicts will occur if someone else is working on the
InternshipApplicationclass at the same time.
Side Features
All the side features share similar execution paths as their respective main features execution logic, only minor changes are applied.
For example, the main differences in these features are on the specific functions used to carry out the execution and the specific lists used to store the relevant items.
-
Taskis a combination ofTodoandNote.
-
TodoListorNoteListare used instead of the list of InternshipApplications with their related methods.
- Methods with
TodoorNoteare used instead ofApplicationorInternship(e.g., updateFilteredTodoList and updateFilteredNoteList are used instead of updateFilteredInternshipList).
- CacheList is not applicable here.
- All the commands (include main features) can be executed in any of the panels. It will automatically switch to the related panel and display the results after every execution.
- All commands here need to go through the
TaskParserafter being processed in theInternEaseParser.
- For GUI settings,
TodousesTodoListPanel,NoteusesNoteListPanel, whileTaskusesMixedPanel.
Task related features
Find Task feature
How is the feature implemented
The FindTaskFeature provides searching function on Todo and Note with keywords.
The execution of FindTaskCommand is similar to FindCommand except it takes no prefix(purely keywords) and it searches on InternshipTodo company name and Note content.
The execution process of find_task is demonstrated by the sequence diagram below.
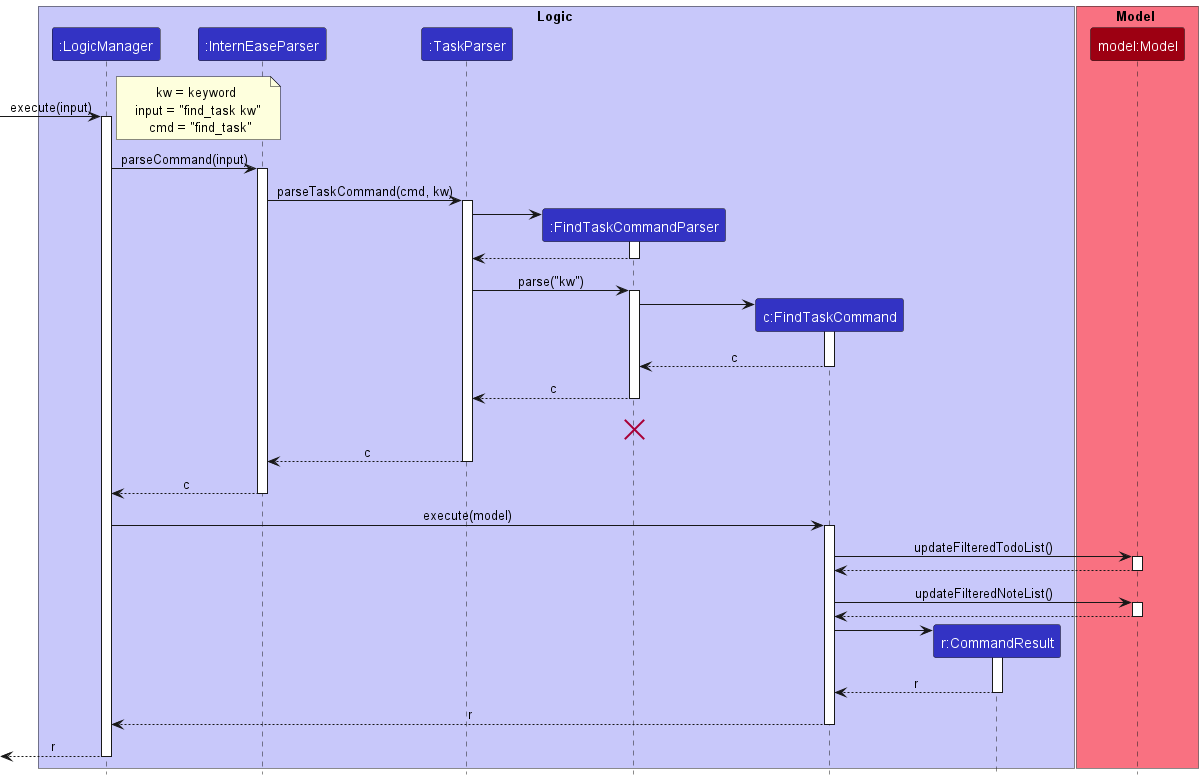
Why is it implemented this way
The FindFeature on InternshipTodo and Note are put together as FindTaskFeature because they have the same characteristic as a Task. It will enable the planning of internship
application to be more effective.
List Task feature
How is the feature implemented
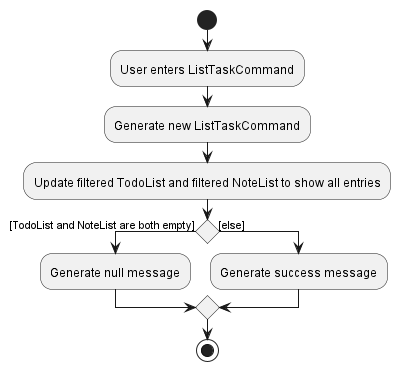
The ListTaskFeature lists both TodoList and NoteList all together in a single panel (mixed panel).
The execution of ListTaskCommand is similar to ListCommand.
The execution process of list_task is demonstrated by the activity diagram below.
Why is it implemented this way
By implementing the listing of both TodoList and NoteList together, user can have a quick overview of current available Todo Tasks and long-lasting reminders – Notes.
Todo related features
Add Todo feature
How is the feature implemented
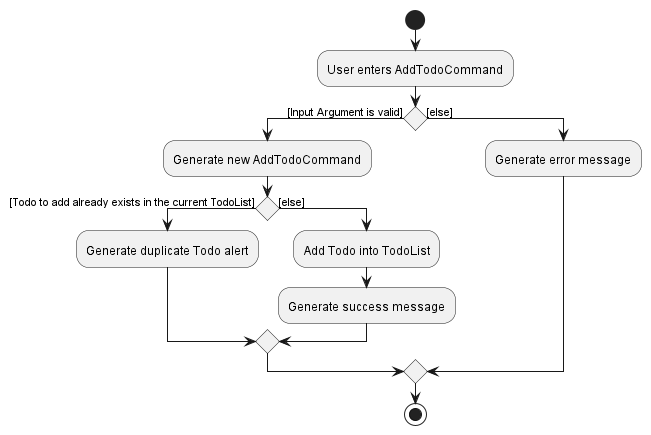
The AddTodoFeature enables the adding of new InternshipTodo instance into the current TodoList.
The execution of AddTodoCommand is similar to AddCommand, the main difference is AddTodoCommand comes with an extra mandatory attribute of ApplicationDeadline.
The execution process of add_todo is demonstrated by the activity diagram below.
Clear Todo feature
How is the feature implemented
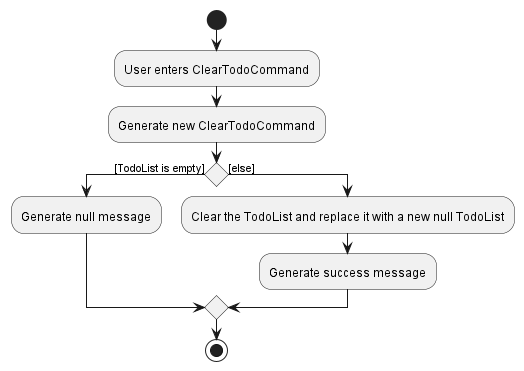
The ClearTodoFeature clears the entire TodoList.
The execution of ClearTodoCommand is similar to ClearCommand. However, cacheList is not available for InternshipTodo so this operation is irreversible.
The execution process of clear_todo is demonstrated by the activity diagram below.
Delete Todo feature
How is the feature implemented
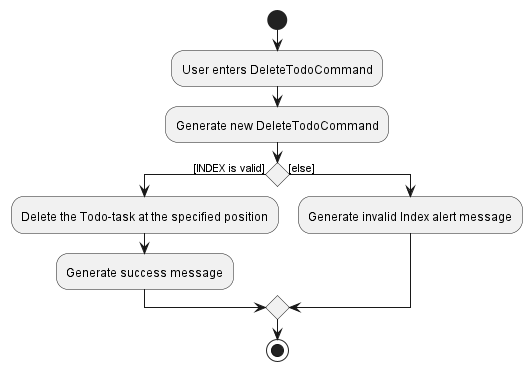
The DeleteTodoFeature deletes the specified InternshipTodo entry respective to the INDEX stated in the command.
The execution of DeleteTodoCommand is similar to DeleteCommand. However, cacheList is not available for InternshipTodo so this operation is irreversible.
The execution process of delete_todo is demonstrated by the activity diagram below.
Edit Deadline feature
How is the feature implemented
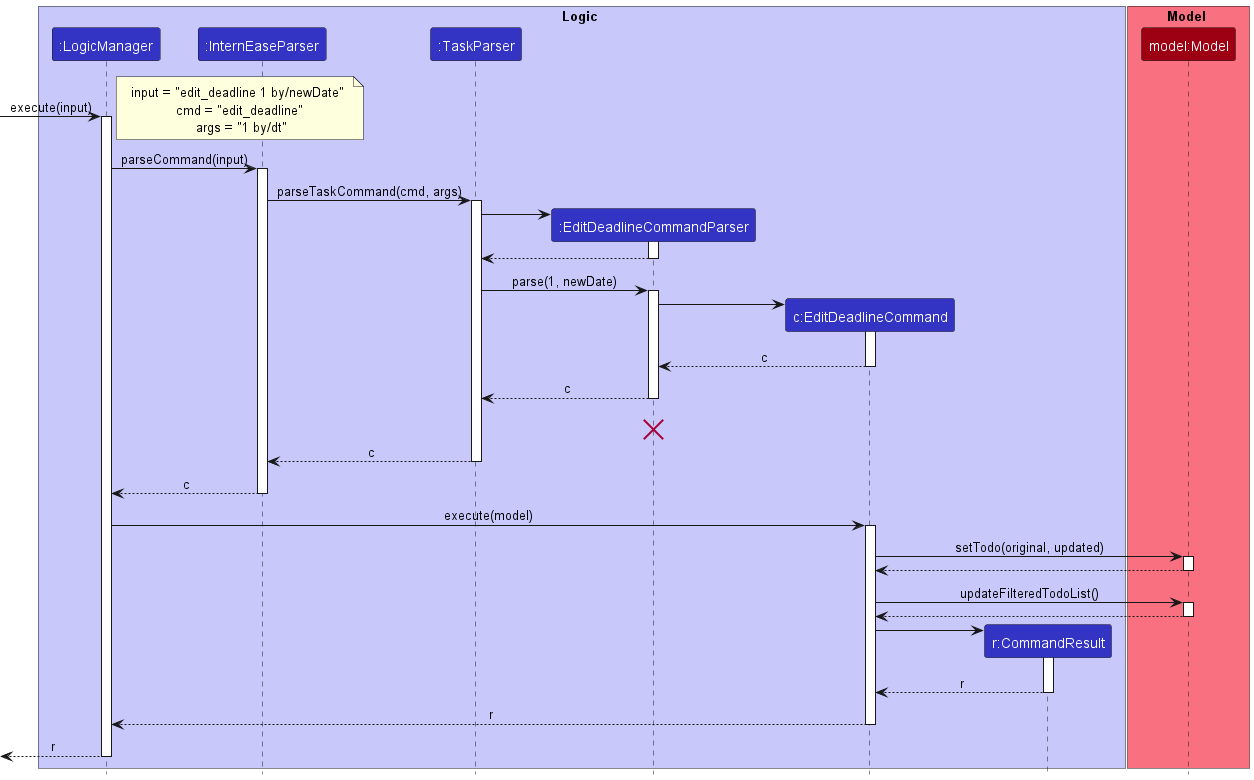
The EditDeadlineFeature enables user to edit the deadline of an InternshipTodo with INDEX specified in the command.
The execution of EditDeadlineCommand is similar to EditStatusCommand, but it edits the ApplicationDeadline for the respective InternshipTodo.
The execution process of edit_deadline is demonstrated by the sequence diagram below.
Edit Content feature
How is the feature implemented
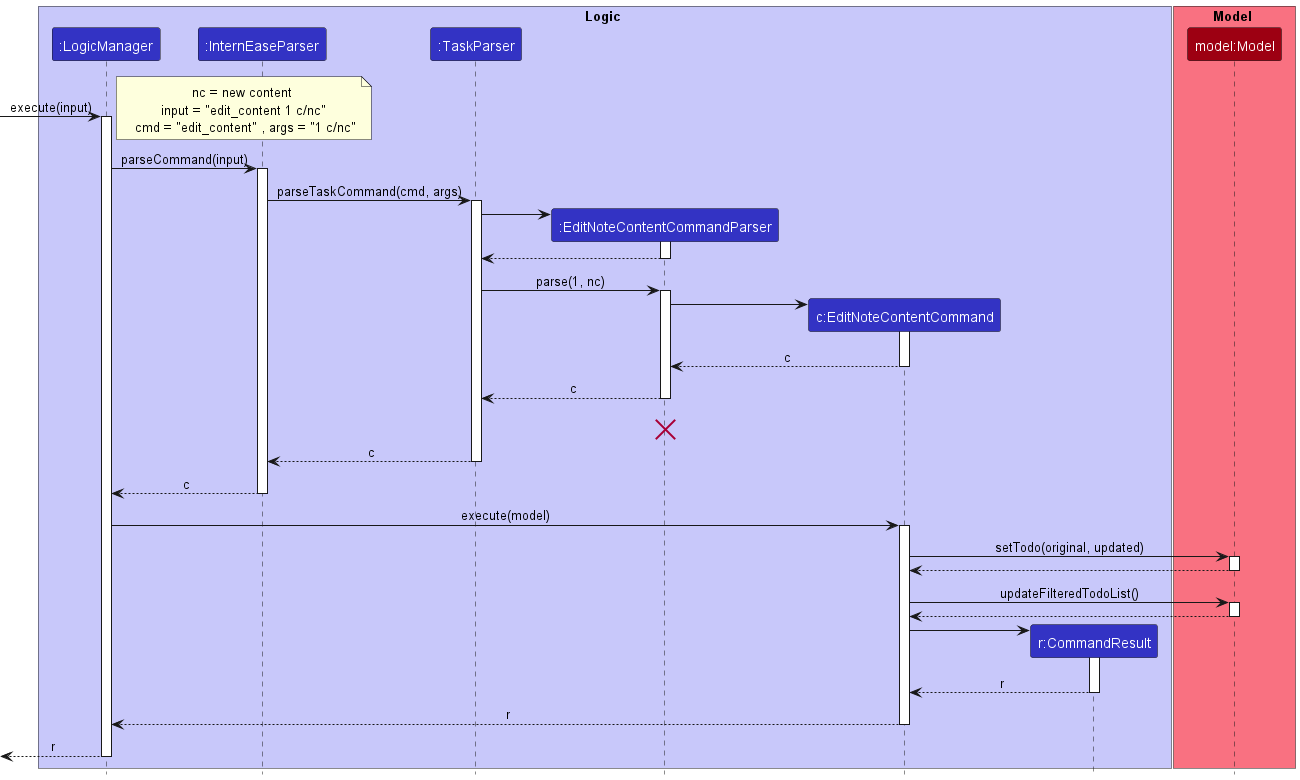
The EditContentFeature enables user to edit the note content of an InternshipTodo with INDEX specified in the command.
The execution of EditNoteContentCommand is similar to EditStatusCommand, but it edits the NoteContent for the respective InternshipTodo.
The execution process of edit_content is demonstrated by the sequence diagram below.
List Todo feature
How is the feature implemented
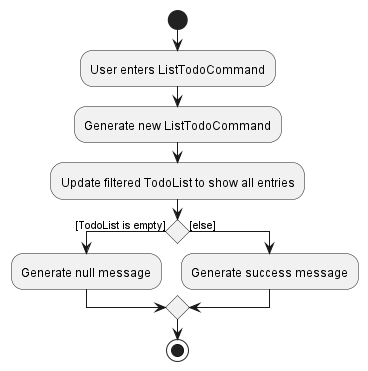
The ListTodoFeature lists current TodoList in the TodoListPanel.
The execution of ListTodoCommand is similar to ListCommand.
The execution process of list_todo is demonstrated by the activity diagram below.
Note related features
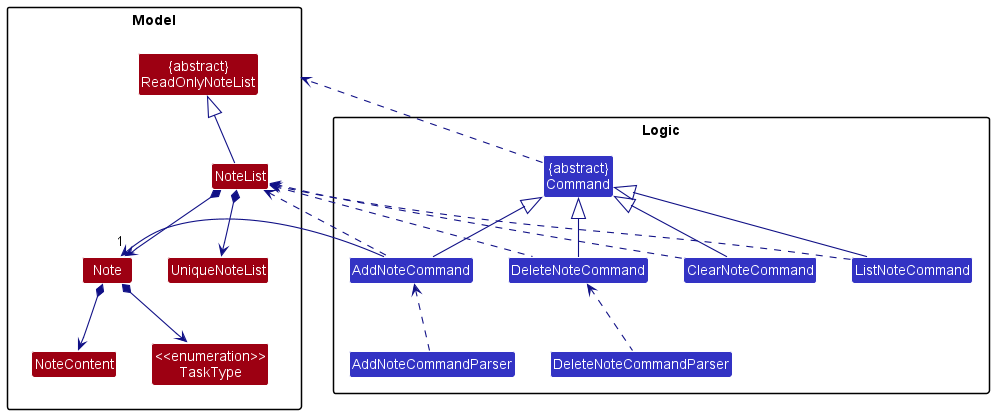
An overview of Note package is shown below.
Add Note feature
How is the feature implemented
The AddNoteFeature enables the adding of new Note instance into the current NoteList.
The execution of AddNoteCommand is similar to AddCommand, the main difference is AddNoteCommand only has a mandatory attribute NOTE_CONTENT.
The execution process of add_note can be demonstrated by the activity diagram of add_todo by replacing todo related phrases or methods to note related phrases or methods.
Clear Note feature
How is the feature implemented
The ClearNoteFeature clears the entire NoteList.
The execution of ClearNoteCommand is similar to ClearCommand. However, cacheList is not available for Note so this operation is irreversible.
The execution process of clear_note can be demonstrated by the activity diagram of clear_todo by replacing todo related phrases or methods to note related phrases or methods.
Delete Note feature
How is the feature implemented
The DeleteNoteFeature deletes the specified Note entry respective to the INDEX stated in the command.
The execution of DeleteNoteCommand is similar to DeleteCommand. However, cacheList is not available for Note so this operation is irreversible.
The execution process of delete_note can be demonstrated by the activity diagram of delete_todo by replacing todo related phrases or methods to note related phrases or methods.
List Note feature
How is the feature implemented
The ListNoteFeature lists current NoteList in the NoteListPanel.
The execution of ListNoteCommand is similar to ListCommand.
The execution process of list_note can be demonstrated by the activity diagram of list_todo by replacing todo related phrases or methods to note related phrases or methods.
Documentation, logging, testing, configuration, dev-ops
Appendix: Requirements
Product scope
Target user profile:
- Computer Science undergraduate
- has a need to manage a number of internship applications
- prefer desktop apps over other types
- able to type fast
- prefers typing to mouse interactions
- is reasonably comfortable using CLI apps
Value proposition: manage internship applications faster and more efficiently than a typical mouse/GUI driven app
User stories
Priorities: High (must have) - * * *, Medium (nice to have) - * *, Low (unlikely to have) - *
| Priority | As a … | I want to … | So that I can… |
|---|---|---|---|
* * * |
new user | see usage instructions | refer to instructions when I forget how to use the App |
* * * |
user | add a new internship application entry | |
* * * |
internship applicant | manage the contact details of the company I am applying to | conveninently contact the company for queries or setting up interviews |
* * * |
internship applicant | note down links to the the documents submmited to the company I am applying to | conveninently retrieve the version of the resume or cover letter submitted to the company |
* * * |
internship applicant | archive my internship application entry | view a list of ongoing internship applications which do not get cluttered over time |
* * * |
internship applicant | delete my submission | remove wrong entries or application that I no longer need |
* * * |
internship applicant | view a list of my internship applications submitted | prevent repeated applications to the same company |
* * |
internship applicant | delete all my applications | start fresh |
* * * |
internship applicant | update the status of my application as it progresses | identify which stage of the application I am in |
Use cases
(For all use cases below, the System is InternEase and the Actor is the user, unless specified otherwise)
Use case: UC01 Add an internship application entry
MSS
- User requests to add an internship applications.
-
InternEase adds the internship application and displays a success message.
Use case ends.
Extensions
- 1a. The command format is invalid.
-
1a1. InternEase shows an error message and gives a specific suggestion on the correct command format.
Use case ends.
-
Use case: UC02 Add contact details of a company to an internship application
MSS
- User requests to view the list of internship applications.
- InternEase shows the internship application list with their indexes specified.
- User requests to add the contact details of a company to a specific internship application in the list by specifying its respective index and details of the contact.
-
InternEase adds the contact details of the company to the internship application and displays a success message.
Use case ends.
Extensions
- 2a. The list is empty.
-
2a1. InternEase shows an alert message that there is no internship application in the list.
Use case ends.
-
-
3a. The provided index is invalid.
- 3a1. InternEase shows an error message and gives a specific suggestion on the index’s range.
-
3a2. User enters a new internship application index.
Steps 3a1 to 3a2 are repeated until a valid index is provided. Use case resumes at step 4.
- 3b. The provided contact is invalid.
- 3b1. InternEase shows an error message and gives a specific suggestion on the format of a valid contact.
-
3b2. User enters a new contact.
Steps 3b1 to 3b2 are repeated until a valid contact is provided. Use case resumes at step 4.
- 3c. The command format is invalid.
- 3c1. InternEase shows an error message and gives a specific suggestion on the correct command format.
-
3c2. User enters a new command.
Steps 3c1 to 3c2 are repeated until a valid command is entered. Use case resumes at step 4.
Use case: UC03 Edit contact details of the company for an internship application
MSS
- User requests to view the list of internship applications.
- InternEase shows the internship application list with their indexes specified.
- User requests to edit the contact details of the company for the specific internship application in the list by specifying its respective index and details of the updated contact.
-
InternEase edits the contact details of the company for the internship application and displays a success message.
Use case ends.
Extensions
- 2a. The list is empty.
-
2a1. InternEase shows an alert message that there is no internship application in the list.
Use case ends.
-
-
3a. The provided index is invalid.
- 3a1. InternEase shows an error message and gives a specific suggestion on the index’s range.
-
3a2. User enters a new internship application index.
Steps 3a1 to 3a2 are repeated until a valid index is provided. Use case resumes at step 4.
- 3b. The provided contact is invalid.
- 3b1. InternEase shows an error message and gives a specific suggestion on the format of a valid contact.
-
3b2. User enters a new contact.
Steps 3b1 to 3b2 are repeated until a valid contact is provided. Use case resumes at step 4.
- 3c. The command format is invalid.
- 3c1. InternEase shows an error message and gives a specific suggestion on the correct command format.
-
3c2. User enters a new command.
Steps 3c1 to 3c2 are repeated until a valid command is entered. Use case resumes at step 4.
Use case: UC04 Delete contact details of the company for an internship application
MSS
- User requests to view the list of internship applications.
- InternEase shows the internship application list with their indexes specified.
- User requests to delete the contact details of the company for the specific internship application in the list by specifying its respective index.
-
InternEase delete the contact details of the company for the internship application and displays a success message.
Use case ends.
Extensions
- 2a. The list is empty.
-
2a1. InternEase shows an alert message that there is no internship application in the list.
Use case ends.
-
-
3a. The provided index is invalid.
- 3a1. InternEase shows an error message and gives a specific suggestion on the index’s range.
-
3a2. User enters a new internship application index.
Steps 3a1 to 3a2 are repeated until a valid index is provided. Use case resumes at step 4.
- 3b. The command format is invalid.
- 3b1. InternEase shows an error message and gives a specific suggestion on the correct command format.
-
3b2. User enters a new command.
Steps 3b1 to 3b2 are repeated until a valid command is entered. Use case resumes at step 4.
Use case: UC05 Add links for documents submitted to the company for an internship application
Similar to UC02 Add contact details of a company to an internship application except that the documents link submitted to a company for an internship application is added.
Use case: UC06 Edit links for documents submitted to the company for an internship application
Similar to UC03 Edit contact details of the company for an internship application except that the documents link submitted to a company for an internship application is edited.
Use case: UC07 Delete contact details of the company for an internship application
Similar to UC04 Delete contact details of the company for an internship application except that the documents link submitted to a company for an internship application is deleted.
Use case: UC08 Revert a recent deleted internship application entry
MSS
- User accidentally deletes an internship application entry.
- User requests to revert the recent execution of delete command.
- InterEase retrieves the internship application from the CacheList and add it back to the end of the current internship application list.
-
InternEase displays a success message.
Use case ends.
Extensions
- 3a. The CacheList is empty.
-
3a1. InternEase shows an alert message that there is no deleted internship application can be restored.
Use case ends.
-
Use case: UC09 Revert all deleted internship application entries in current session
MSS
- User accidentally deletes or clears some internship application entries.
- User requests to restore all the deleted or cleared entries.
- InterEase adds all the cached internship applications back to the end of the current internship application list.
-
InternEase displays a success message.
Use case ends.
Extensions
- 3a. The CacheList is empty.
-
3a1. InternEase shows an alert message that there is no deleted internship application can be restored.
Use case ends.
-
Use case: UC10 Delete an internship application entry
MSS
- User requests to view the list internship applications.
- InternEase shows the internship applications list with their indexes specified.
- User requests to delete a specific internship application in the list by specifying its respective index.
-
InterEase deletes the internship application from the list and displays a success message.
Use case ends.
Extensions
- 2a. The list is empty.
-
2a1. InternEase shows an alert message that there is no internship application in the list.
Use case ends.
-
- 3a. The given index is invalid.
-
3a1. InternEase shows an error message and gives specific suggestion on the index’s range.
-
3a2. User enters new internship application index.
Steps 3a1 to 3a2 are repeated until a valid index is provided. Use case resumes at step 4.
-
-
3b. The command format is incorrect.
-
3b1. InternEase shows an error message and gives specific suggestion on the command format.
-
3b2. User enters new command.
Steps 3b1 to 3b2 are repeated until a valid command is provided. Use case resumes at step 4.
-
Use case: UC11 Sort internship applications
MSS
- User specifies the order, either company name, job title, status or interview date for the list of internship applications to be sorted.
- InternEase shows the sorted list of application ordered by the attribute specified. Use case ends.
Extensions
- 1a. User specifies more than one attribute.
-
1a1. InternEase notices user that the command format is invalid.
Use case ends.
-
Use case: UC12 Clear all internship application entries
MSS
- User requests to clear all the data in the application.
-
InternEase clears all the internship application entries, shows an empty list of internship application data and displays a success message.
Use case ends.
Use case: UC13 Edit the status of an internship application
MSS
- User requests to view the list of internship applications.
- InternEase shows the internship application list with their indexes specified.
- User requests to edit the application status of a specific internship application in the list by specifying its respective index and the updated status.
-
InternEase updates the application status of the internship application and displays a success message.
Use case ends.
Extensions
-
2a. The list is empty.
-
2a1. InternEase shows an alert message that there is no internship application in the list.
Use case ends.
-
-
3a. The provided index is invalid.
- 3a1. InternEase shows an error message and gives a specific suggestion on the index’s range.
-
3a2. User enters a new internship application index.
Steps 3a1 to 3a2 are repeated until a valid index is provided. Use case resumes at step 4.
-
3b. The provided status is invalid.
- 3b1. InternEase shows an error message and gives a specific suggestion on the possible statuses.
-
3b2. User enters a new internship application status.
Steps 3b1 to 3a2 are repeated until a valid status is provided. Use case resumes at step 4.
-
3c. The command format is invalid.
- 3c1. InternEase shows an error message and gives a specific suggestion on the correct command format.
-
3c2. User enters a new command.
Steps 3c1 to 3c2 are repeated until a valid command is entered. Use case resumes at step 4.
Use case: UC14 Help
MSS
- User requests for help.
- InternEase shows a list of available commands to the user.
Use case: UC15 List
MSS
- User requests to view the list of internship applications.
-
InternEase shows all the ongoing internship applications as a list with their indexes specified.
Use case ends.
Extensions
- 1a. The list is empty.
-
1a1. InternEase shows an alert message that there is no internship application in the list.
Use case ends.
-
Use case: UC16 Clear relevant internship application entries by keyword
MSS
- User requests to view the list of internship applications.
- InternEase shows the internship application list with their attributes specified.
- User requests to clear all the relevant entries with specific keyword and its attribute.
- InternEase requests confirmation from user.
-
InternEase updates the application status of the internship application and displays a success message.
Use case ends.
Extensions
- 1a. The list is empty.
-
1a1. InternEase shows an alert message that there is no internship application in the list.
Use case ends.
-
- 2a. The provided attribute is invalid.
- 2a1. InternEase shows an error message and gives a specific suggestion on the correct command format.
-
2a2. User enters a new command.
Steps 2a1 to 2a2 are repeated until a valid attribute is provided. Use case resumes at step 4.
Use case: UC17 Archive an internship application
MSS
- User requests to view the list of internship applications.
- InternEase shows the internship application list with their indexes specified.
- User requests to archive a specific internship application in the list by specifying its respective index.
-
InternEase archives the internship application and displays a success message.
Use case ends.
Extensions
-
2a. The list is empty.
-
2a1. InternEase shows an alert message that there is no internship application in the list.
Use case ends.
-
-
3a. The provided index is invalid.
- 3a1. InternEase shows an error message and gives a specific suggestion on the index’s range.
-
3a2. User enters a new internship application index.
Steps 3a1 to 3a2 are repeated until a valid index is provided. Use case resumes at step 4.
- 3b. The command format is invalid.
- 3b1. InternEase shows an error message and gives a specific suggestion on the correct command format.
-
3b2. User enters a new command.
Steps 3b1 to 3b2 are repeated until a valid command is entered. Use case resumes at step 4.
-
3c. The specified internship application is already archived.
-
3a1. InternEase shows an error message.
Use case ends.
-
Use case: UC18 Unarchive an internship application
Similar to UC17 Archive an internship application except that the internship application is unarchived.
Use case: UC19 List archived internship applications
Similar to UC15 List except that only archived internship applications are shown.
Use case: UC20 Find an application by its company name and job title
MSS
- User specifies keyword for matching company name and job title for the internship application.
- InternEase shows a list of application whose company name or job title fulfill the matching keyword. Use case ends.
Extensions
- 1a. The list is empty.
-
1a1. InternEase notices user that there is no internship application in the list.
Use case ends.
-
Use case: UC21 Find an application by its status
Similar to UC20 Find an application by its company name and job title except it’s now finding by status.
Use case: UC22 Find an application by the range of interview date
Similar to UC20 Find an application by its company name and job title except user specifies a range of date when the interview date falls within.
Side features
Use case: UC23 Add a todo task entry
Similar to UC01 Add an internship application entry except todo task is added instead of an internship application.
Use case: UC24 List todo
Similar to UC15 List except todo tasks are listed instead of internship applications.
Use case: UC25 Edit the note content of a todo task
Similar to UC13 Edit the status of an internship application except the note content of a todo task is edited.
Use case: UC26 Edit the deadline of a todo task
Similar to UC13 Edit the status of an internship application except the deadline of a todo task is edited.
Use case: UC27 Delete a todo task entry
Similar to UC10 Delete an internship application entry except the specified todo task is deleted.
Use case: UC28 Clear all todo task entries
Similar to UC12 Clear all internship application entries except all the todo task entries are cleared instead of all the internship application entries.
Use case: UC29 Add a note
Similar to UC01 Add an internship application entry except a note entry is added instead of an internship application.
Use case: UC30 List note
Similar to UC15 List except note entries are listed instead of internship applications.
Use case: UC31 Delete a note entry
Similar to UC10 Delete an internship application entry except the specified note entry is deleted.
Use case: UC32 Clear all note entries
Similar to UC12 Clear all internship application entries except all the notes entries are cleared instead of all the internship application entries.
Use case: UC33 List task
Similar to UC15 List except todo task entries and note entries are listed instead of internship applications.
Use case: UC34 Find a task by its field
Similar to UC20 Find an application by its company name and job title except todo task entries and note entries which match the specified keyword are filtered out and listed.
Use case: UC35 Edit an internship application
MSS
- User requests to view the list of internship applications.
- InternEase shows the internship application list with their indexes specified.
- User requests to edit the details of specific internship application in the list by specifying its index.
-
InternEase edits the details of the internship application and displays a success message.
Use case ends.
Extensions
- 2a. The list is empty.
-
2a1. InternEase shows an alert message that there is no internship application in the list.
Use case ends.
-
-
3a. The provided index is invalid.
- 3a1. InternEase shows an error message and gives a specific suggestion on the index’s range.
-
3a2. User enters a new internship application index.
Steps 3a1 to 3a2 are repeated until a valid index is provided. Use case resumes at step 4.
- 3b. The provided details is invalid.
- 3b1. InternEase shows an error message and gives a specific suggestion on the format of valid details.
-
3b2. User enters new details.
Steps 3b1 to 3b2 are repeated until valid details is provided. Use case resumes at step 4.
- 3c. The command format is invalid.
- 3c1. InternEase shows an error message and gives a specific suggestion on the correct command format.
-
3c2. User enters a new command.
Steps 3c1 to 3c2 are repeated until a valid command is entered. Use case resumes at step 4.
Non-Functional Requirements
- Should work on any mainstream OS as long as it has Java
11or above installed. - Should be able to hold up to 1000 internship applications without a noticeable increase in sluggishness in performance for typical usage.
- A user with above average typing speed for regular English text (i.e. not code, not system admin commands) should be able to accomplish most of the tasks faster typing commands than using the mouse.
- InternEase doesn’t support storing the actual file for the resume and cover letter. User can only include links to their resume and cover letter used for a particular application.
- InternEase is unable to remind user through any platform outside of the application.
Glossary
- CLI: Command line interface
- GUI: Graphical User interface
- Mainstream OS: Windows, Linux, Unix, OS-X
- InternshipTodo: Internships that are planned to apply
- Note: Act as long-lasting reminders for future internship applications and interviews
Appendix: Instructions for manual testing
Given below are instructions to test the app manually.
Launch and shutdown
-
Initial launch of InternEase
- Download the jar file and copy into an empty folder
- Launch the application by:
- Double-click the jar file.
or - Open a command terminal,
cdinto the folder you put the jar file in, and use thejava -jar InternEase.jarcommand to run the program.
Expected: Shows the GUI with a set of sample internship applications. The window size may not be optimal.
- Double-click the jar file.
-
Saving window preferences
-
Resize the window to an optimal size. Move the window to a different location. Close the window.
-
Re-launch the app by double-clicking the jar file.
Expected: The most recent window size and location is retained.
-
-
Shutting down InternEase
- Shut down InternEase
- Using
exitcommand.
or - Close the window using the ‘X’ button on top-right of the window frame.
- Using
- All prior activities will be saved.
- Re-launch InternEase by Step 1(ii).
Expected: All the saved data will be loaded and displayed.
- Shut down InternEase
Appendix: Planned Enhancement
- The current display duration may not suit everyone and the dialog content looks messy on showing all particulars. The display duration could be customized (can be decided by user) and the dialog content could be enhanced to show important particulars only in further enhancement.
- All commands are executable on any panel (e.g., command
delete_note 2can delete the 2nd note even though the panel is showing the todo list only). We plan to have some enhancement on it by implementing some custom restrictions (can be decided by user) to limit the command executions according to the displaying GUI. - The current method of displaying the details of an internship application by clicking the card on the left panel to display it on the right panel is less ideal to users who prefer to perform operations solely via CLI. We plan to enhance their user experience by including a
viewcommand in future iterations, allowing them to show the details of an internship application on the right panel by including anINDEXwhen typing in the command. - The current method for managing documents used for an internship application only supports
HTTPandHTTPSlinks to those documents. We plan to enhance this feature by allowing users to upload the files directly to our app, so that they can view the file immediately without an Internet connection.